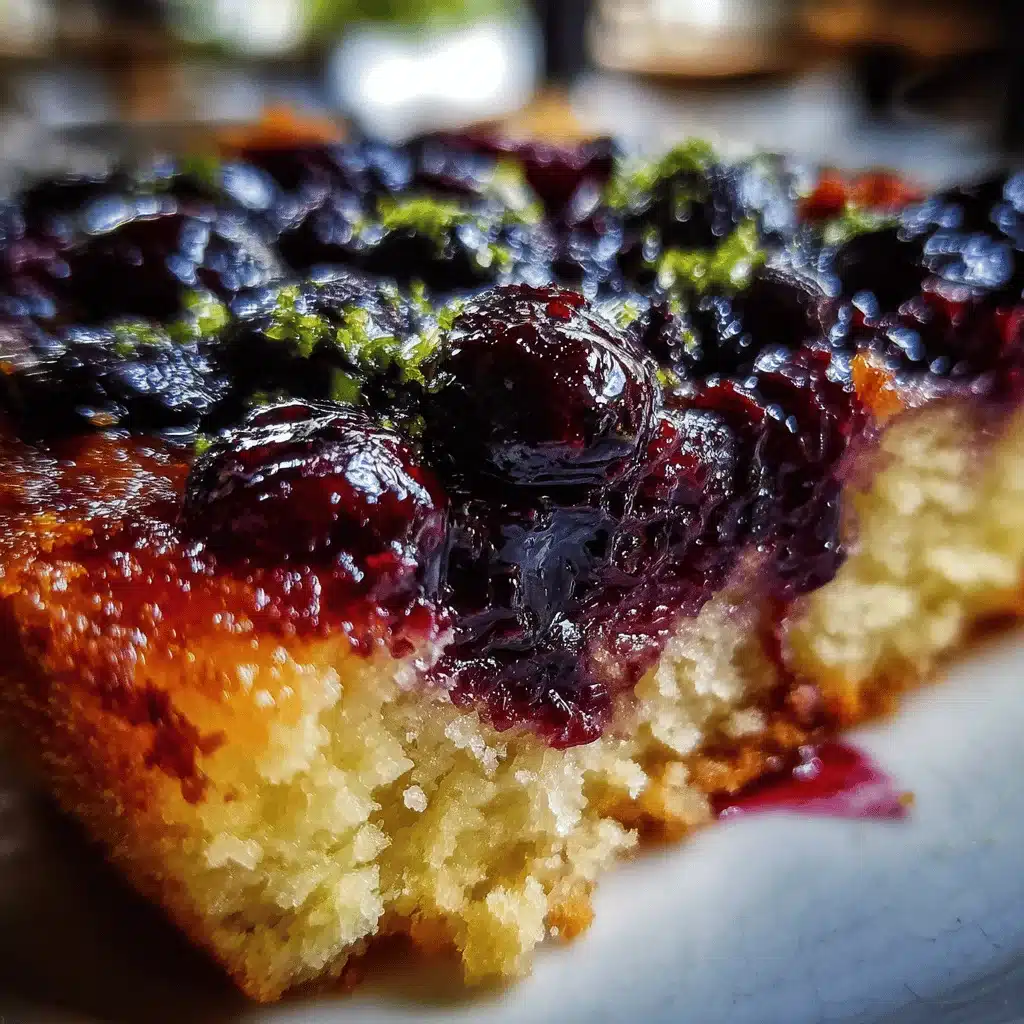
Sticky, juicy blueberries bubbling up through a golden, buttery cake – that’s the magic of blueberry upside down cake. The smell alone is enough to draw everyone into the kitchen, noses in the air, eager for a slice. I still remember the first time I flipped one out of the pan, holding my breath as the deep indigo syrup trickled down the sides and pooled around the base – pure summer in dessert form.
This blueberry upside down cake recipe came into my life thanks to a spontaneous berry-picking trip a few summers ago. I returned with a bucket overflowing with plump, sun-warmed blueberries and a craving for something more exciting than muffins. After a few kitchen experiments (and a couple of very sticky pans), I dialed in this easy, juicy cake that’s now a family favorite.
Why do I keep coming back to this cake? It’s the perfect blend of nostalgia and freshness. The caramelized blueberry layer is tangy and sweet, almost like homemade jam. The cake itself is soft, tender, and just rich enough to feel special without being heavy. Whether you’ve got a handful of berries from the farmer’s market or a bag from the freezer, this recipe transforms them into a show-stopping dessert with minimal fuss.
If you’re looking for a blueberry upside down cake that tastes like sunshine, is simple to make, and is guaranteed to impress (even if you’re not a “baker”), you’re in the right place. I’ve tested this recipe every summer for years and tweaked it for foolproof results. It’s become my go-to for picnics, potlucks, and those “just because” summer nights. Let’s dive into the blueberry bliss together!
Why You’ll Love This Blueberry Upside Down Cake Recipe
- Quick & Easy: You can whip up this blueberry upside down cake in under an hour, start to finish. No fancy techniques or bakery-level skills required.
- Simple Ingredients: Everything you need is probably already in your kitchen – flour, sugar, butter, eggs, and, of course, blueberries. No strange powders or hard-to-find stuff.
- Perfect for Summer Gatherings: This cake is made for backyard BBQs, Sunday brunches, and lazy picnics in the park. It travels well and looks stunning on any table.
- Crowd-Pleaser: I’ve never taken leftovers home – kids love the sweet, jammy blueberry layer, and adults appreciate the homemade taste. It’s always a hit at family get-togethers.
- Unbelievably Delicious: The contrast between the tangy, juicy berries and the buttery cake is downright irresistible. Plus, flipping it out of the pan is like a magic trick everyone wants to watch!
What sets my blueberry upside down cake apart? I use a little lemon zest in the batter to brighten the berries, and a touch of brown sugar in the topping for extra caramelization. I’ve learned through trial and error that tossing the blueberries with cornstarch keeps them perfectly jammy, not runny or soggy. The cake is tender, not dry – thanks to a mix of butter and sour cream. This is the version that finally ticked all my boxes: juicy, sturdy enough to flip, and bursting with blueberry flavor in every bite.
Honestly, this isn’t just dessert – it’s a memory-maker. You get that old-fashioned comfort food vibe, but with a lighter, fruitier twist that feels just right for warm weather. If you want a dessert that makes people sigh happily, this is it. No stress, no fuss – just pure blueberry joy.
Ingredients Needed
This blueberry upside down cake uses easy, honest ingredients that create a cake bursting with flavor and color. Here’s what you’ll need – nothing complicated, just pure summer goodness!
- For the blueberry topping:
- 2 cups (300 g) fresh or frozen blueberries (no need to thaw if frozen; wild blueberries are extra juicy!)
- 1/2 cup (100 g) granulated sugar (adds sweetness and helps the berries caramelize)
- 2 tablespoons (30 g) unsalted butter, melted (for richness and that classic upside down cake shine)
- 2 tablespoons (25 g) light brown sugar (adds a deeper, caramel flavor – trust me, it makes a difference)
- 1 tablespoon (8 g) cornstarch (thickens the berry layer so it’s jammy, not watery)
- 1 teaspoon lemon zest (brightens the blueberry flavor, especially if your berries are sweet)
- For the cake batter:
- 1 1/4 cups (150 g) all-purpose flour
- 1 teaspoon baking powder
- 1/4 teaspoon baking soda
- 1/4 teaspoon salt
- 1/2 cup (115 g) unsalted butter, softened (for a tender, buttery crumb; I like Kerry Gold!)
- 2/3 cup (135 g) granulated sugar
- 2 large eggs, room temperature
- 1 teaspoon pure vanilla extract (for that bakery smell and taste – use real vanilla if you can)
- 1/2 cup (120 g) sour cream or plain Greek yogurt (guarantees moistness and a little tang)
- 2 tablespoons (30 ml) milk (whole or 2% is best, but any works)
- Optional: 1/2 teaspoon almond extract (totally optional, but brings out the berries beautifully)
If you need to swap something: use frozen berries if fresh aren’t available, swap sour cream for Greek yogurt, or make it dairy-free with vegan butter and coconut yogurt. For a gluten-free version, use a 1:1 gluten-free flour blend (I’ve had great results with Bob’s Red Mill). If you’re out of lemon, a splash of orange zest works too. The only thing I wouldn’t skip is the cornstarch – it’s key for that glossy, thick blueberry layer!
Pro tip: If you’re using very tart or underripe blueberries, add an extra tablespoon of sugar to the topping. For the best color and flavor, wild blueberries or local farm berries are my favorites, but supermarket berries work great too.
Equipment Needed
- 9-inch (23 cm) round cake pan (A springform pan also works, but line the bottom with parchment to prevent leaks. I use a basic nonstick cake pan – nothing fancy.)
- Mixing bowls (At least two – one for the berries, one for the batter.)
- Hand mixer or stand mixer (You can get away with a sturdy whisk and elbow grease, but an electric mixer makes life easier.)
- Rubber spatula (For scraping every bit of batter out – you don’t want to waste any!)
- Measuring cups and spoons (Accuracy helps, especially for baking powder and flour.)
- Zester or fine grater (For the lemon zest. If you don’t have one, a vegetable peeler and a sharp knife do the trick.)
- Wire rack (For cooling and easy flipping. If you don’t have one, a sturdy plate works in a pinch.)
- Parchment paper (Optional, but lining the bottom of the pan makes flipping stress-free.)
I’ve used everything from vintage Pyrex pans to cheap supermarket cake tins – as long as you grease well, it’ll work! If you’re worried about sticking, parchment on the bottom is your friend. For mixing, a good old wooden spoon works, but nothing beats a hand mixer for fluffy, lump-free batter. Keep your pans in good shape by hand-washing and drying thoroughly – upside down cakes are sticky business!
On a budget? Dollar store pans and basic whisks do the job just fine. The key is greasing your pan and being gentle with the flip. Trust me, you don’t need a pro kitchen for this blueberry upside down cake recipe!
Preparation Method
-
Prep your pan and oven.
Preheat your oven to 350°F (175°C). Grease a 9-inch (23 cm) round cake pan with butter or nonstick spray. For extra insurance, line the bottom with a circle of parchment paper. (This step saves you from heartache if your berries are super juicy!)
-
Make the blueberry topping.
In a medium bowl, toss 2 cups (300 g) blueberries with 1/2 cup (100 g) sugar, 2 tablespoons (25 g) brown sugar, 1 tablespoon (8 g) cornstarch, and 1 teaspoon lemon zest. Pour in 2 tablespoons (30 g) melted butter and stir gently. Spread the blueberry mixture evenly over the bottom of your prepared pan. Try to create an even layer (it helps the cake bake up flat).
Tip: If using frozen berries, don’t thaw – just toss with the sugar and cornstarch straight from the freezer. If your berries are super ripe and juicy, add an extra 1/2 tablespoon cornstarch to keep things thick.
-
Mix the dry ingredients.
In a separate bowl, whisk together 1 1/4 cups (150 g) flour, 1 teaspoon baking powder, 1/4 teaspoon baking soda, and 1/4 teaspoon salt. Set aside.
-
Cream butter and sugar.
In a large bowl, beat 1/2 cup (115 g) softened butter with 2/3 cup (135 g) sugar until light and fluffy – about 2-3 minutes with a hand mixer on medium. Scrape down the sides as needed. (Don’t rush this step – creaming makes the cake super tender!)
-
Add eggs and flavorings.
Beat in 2 large eggs, one at a time, mixing well after each. Add 1 teaspoon vanilla extract and, if using, 1/2 teaspoon almond extract. Mix until smooth.
-
Mix in sour cream and milk.
Add 1/2 cup (120 g) sour cream (or Greek yogurt) and 2 tablespoons (30 ml) milk. Beat until combined. The batter may look a little curdled – that’s normal, it’ll smooth out soon.
-
Combine wet and dry ingredients.
Add the dry ingredients to the wet mixture. Stir gently with a spatula until just combined. Don’t overmix – a few lumps are okay. Overmixing leads to tough cake!
-
Assemble and bake.
Carefully dollop the batter over the blueberry layer in the pan. Spread gently with a spatula, covering the berries completely. Bake for 35-40 minutes, or until the top is golden and a toothpick inserted in the center comes out clean (a few blueberry streaks are fine, but no wet batter).
Warning: Ovens vary! Check at 35 minutes. If the center jiggles a lot or the edges look dark, tent loosely with foil for the last 5 minutes.
-
Cool and flip.
Let the cake cool in the pan for 10-15 minutes. Run a knife around the edge to loosen. Place a plate or wire rack over the pan, then (deep breath!) quickly and confidently flip the whole thing over. Lift off the pan and peel away the parchment if used. If any berries stick, just patch them back on – it’ll still look stunning.
-
Serve.
Let cool for at least 10 more minutes before slicing. Serve warm or at room temperature. If you want to go over the top, add a scoop of vanilla ice cream or whipped cream on the side!
Personal tip: If you’ve ever had a cake stick, you know the heartbreak. Parchment paper is my insurance, and letting the cake cool just enough (but not too much) is the sweet spot for a perfect flip. If you do end up with a little blueberry “artwork” on your plate, just call it rustic!
Cooking Tips & Techniques
- Get your pan ready: Grease generously and use parchment if you’re nervous about sticking. I’ve had my fair share of upside down cakes that refused to budge – parchment is a lifesaver.
- Don’t overmix the batter: Once you add the dry ingredients, stir just until combined. Overmixing = dense, tough cake. If there are streaks of flour, stop – they’ll bake out.
- Use room temperature ingredients: Butter, eggs, and sour cream blend best when not cold. If you forget, warm eggs in a cup of warm water for 10 minutes and zap sour cream in the microwave for 10 seconds.
- Let the blueberry topping cool slightly before flipping: If you flip too soon, the syrup can run everywhere. If you wait too long, the topping will stick. Around 10-15 minutes is just right.
- Check for doneness with your senses: The cake should spring back when touched and the edges pull away from the pan. If you smell caramelized fruit, you’re close! A toothpick with a few moist crumbs (not batter) means it’s ready.
- Fixing a sticky situation: If berries stick to the pan, just scoop them off and patch the top. No one will notice once you slice it. The flavor is still dreamy!
- Timing tricks: While the cake bakes, clean up, whip cream, or set the table. This recipe is forgiving – it’ll stay moist even if you’re a few minutes past the timer.
I’ve learned the hard way that rushing the flip or using a dry cake batter never pays off. Patience and a good greasing are the keys to blueberry upside down cake success. If you make this a couple of times, you’ll get a feel for your oven and pan – and the cake will be even better every time!
Variations & Adaptations
- Gluten-Free Blueberry Upside Down Cake: Swap the all-purpose flour for a 1:1 gluten-free baking blend. I’ve tried this with Bob’s Red Mill and it works beautifully – just as moist and flavorful!
- Mixed Berry Upside Down Cake: Replace half the blueberries with raspberries, blackberries, or sliced strawberries for a colorful twist. In late summer, I love tossing in a handful of wild blackberries with the blueberries for an extra tart kick.
- Lemon-Blueberry Upside Down Cake: Stir an extra tablespoon of lemon zest into the cake batter and finish with a lemon glaze (just whisk powdered sugar with lemon juice and drizzle over the cooled cake). It’s a citrusy dream!
- Dairy-Free Option: Use vegan butter and coconut yogurt in place of butter and sour cream. Almond milk works great for the splash of milk. The cake is just as tender and delicious!
- Spiced Upside Down Cake: Add 1/2 teaspoon ground cinnamon or cardamom to the cake batter for a cozy, fall-inspired version.
- Personal favorite: I once tossed in a handful of fresh basil with the blueberries – sounds weird, but the herbal note was surprising and wonderful. If you’re feeling adventurous, give it a try!
If you need a nut-free version, just skip the almond extract. For a lower sugar treat, reduce the topping sugar by 2 tablespoons – the berries will still shine. No cake pan? Use a deep pie plate or oven-safe skillet. This blueberry upside down cake recipe is here to make your dessert dreams come true, no matter your pantry or preferences!
Serving & Storage Suggestions
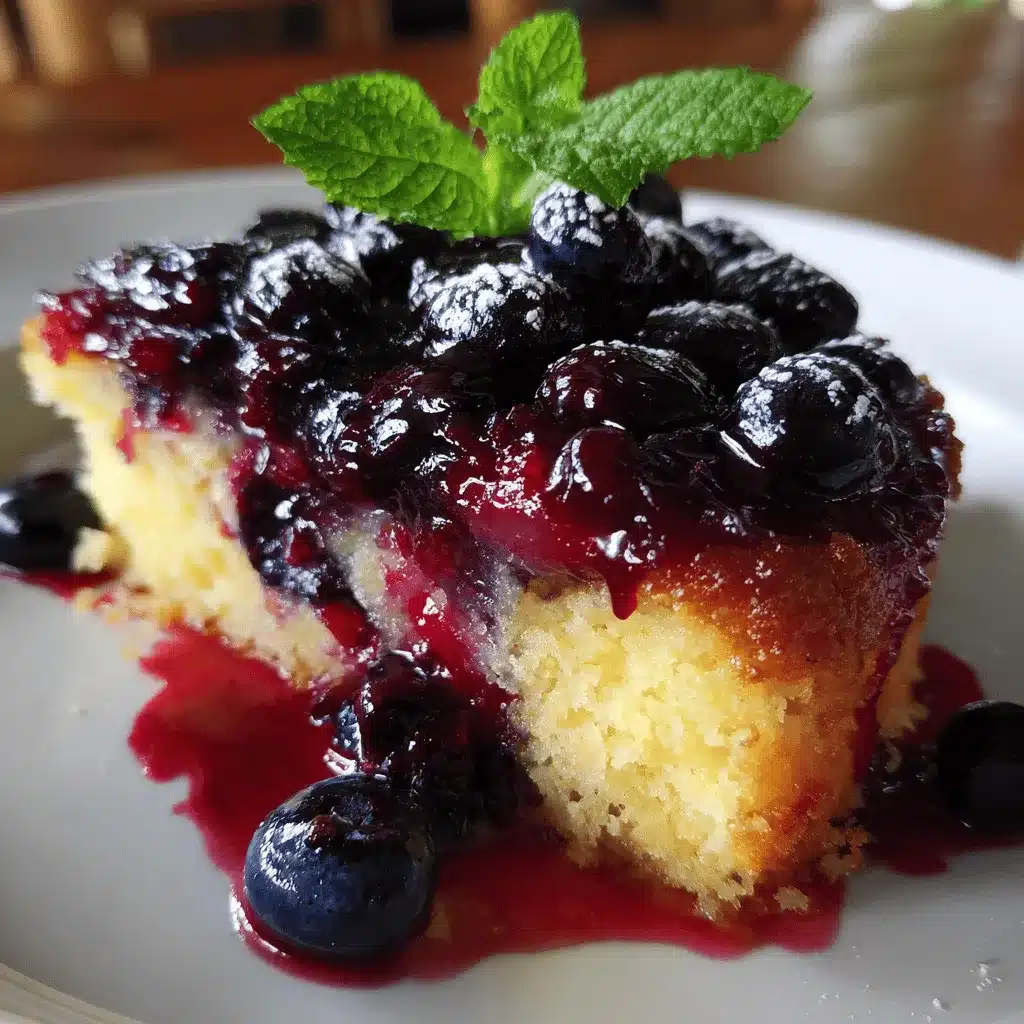
This blueberry upside down cake is best served slightly warm or at room temperature – that’s when the blueberries are at their juiciest and the cake is melt-in-your-mouth tender. For a showstopper presentation, sprinkle with powdered sugar or add a scoop of vanilla ice cream or whipped cream. I love serving slices with iced coffee or lemonade on a sunny afternoon – it just screams summer!
To store leftovers, cover the cake tightly and refrigerate for up to 4 days. The berry layer keeps the cake super moist, and honestly, it tastes even better the next day as the flavors meld. For longer storage, wrap slices in plastic and freeze for up to 2 months. Thaw overnight in the fridge or microwave for 20-30 seconds for a quick treat.
To reheat, warm slices in the microwave for about 15 seconds or in a 300°F (150°C) oven for 5-8 minutes. The blueberry syrup will get nice and gooey again. If you’re making this for a party, you can bake it a day in advance and flip just before serving – it’ll look (and taste) freshly made!
Bonus tip: If you have extra berries, scatter a few fresh ones on top for a pop of color. The cake is lovely cold, too, so don’t stress if you’re serving it straight from the fridge on a hot day.
Nutritional Information & Benefits
Each slice of blueberry upside down cake (1/10th of the cake) has about 250-290 calories, depending on your ingredient choices. You’ll get around 4 grams of protein, 10 grams of fat, and 38 grams of carbs. Blueberries are a great source of antioxidants, vitamin C, and fiber, while the moderate sugar content makes this cake a relatively light treat for a dessert.
This recipe is naturally nut-free (skip almond extract if needed) and can be adapted to be dairy-free or gluten-free. Eggs are the only essential allergen, but you can try a flax egg for a vegan version (though I haven’t tested it myself yet).
From a wellness perspective, I love that you can sneak extra berries into every bite. The cake is lighter than most upside down cakes, thanks to yogurt and a modest amount of butter. It’s a treat, for sure, but one you can feel good about sharing with friends and family – especially during berry season!
Conclusion
If you’re searching for a summer dessert that’s as easy as it is impressive, this blueberry upside down cake recipe is your answer. The juicy berries, golden cake, and caramelized edges come together for a treat that’s pure happiness on a plate. It’s the kind of cake that looks fancy but feels homey, and it never fails to get rave reviews (seriously, people always ask for the recipe).
Don’t be afraid to customize – toss in some lemon zest, swap in other berries, or make it gluten-free. That’s the beauty of this simple, forgiving recipe. I love it because it tastes like the best parts of summer: sweet, bright, and a little messy around the edges.
Ready to bake your own? Give it a try, then let me know how it turned out! Drop a comment, share your twist, or tag your cake on Pinterest so we can all drool together. Here’s to juicy blueberries, buttery cake, and desserts that make memories. Happy baking!
Frequently Asked Questions
Can I use frozen blueberries for this blueberry upside down cake?
Yes! No need to thaw them – just toss with the sugar and cornstarch straight from the freezer. The cake may need a couple extra minutes of baking time, but it’ll be just as juicy.
What’s the best way to flip an upside down cake without it breaking?
Let the cake cool for 10-15 minutes, then run a knife around the edge. Place a plate or rack on top, grip both firmly, and flip in one confident motion. If any berries stick, just patch them back on – no one will notice!
Can I make this blueberry upside down cake ahead of time?
Absolutely! Bake the cake a day in advance and store it (unflipped) at room temperature. Flip and garnish right before serving for the best presentation.
How do I make this recipe gluten-free?
Just use a 1:1 gluten-free flour blend in place of all-purpose flour. I’ve tested it with Bob’s Red Mill and it works great – the cake stays tender and flavorful.
What can I serve with blueberry upside down cake?
It’s delicious on its own, but I love it with a scoop of vanilla ice cream, whipped cream, or a drizzle of lemon glaze. Pair with iced tea or coffee for the perfect summer treat!
Pin This Recipe!
Blueberry Upside Down Cake
- Total Time: 1 hour
- Yield: 10 servings 1x
Description
This easy blueberry upside down cake features juicy, caramelized blueberries bubbling up through a soft, buttery cake. It’s a show-stopping summer dessert that’s simple to make and guaranteed to impress at any gathering.
Ingredients
- 2 cups (300 g) fresh or frozen blueberries
- 1/2 cup (100 g) granulated sugar
- 2 tablespoons (30 g) unsalted butter, melted
- 2 tablespoons (25 g) light brown sugar
- 1 tablespoon (8 g) cornstarch
- 1 teaspoon lemon zest
- 1 1/4 cups (150 g) all-purpose flour
- 1 teaspoon baking powder
- 1/4 teaspoon baking soda
- 1/4 teaspoon salt
- 1/2 cup (115 g) unsalted butter, softened
- 2/3 cup (135 g) granulated sugar
- 2 large eggs, room temperature
- 1 teaspoon pure vanilla extract
- 1/2 cup (120 g) sour cream or plain Greek yogurt
- 2 tablespoons (30 ml) milk
- Optional: 1/2 teaspoon almond extract
Instructions
- Preheat oven to 350°F (175°C). Grease a 9-inch round cake pan with butter or nonstick spray. Line the bottom with parchment paper for easy release.
- In a medium bowl, toss blueberries with granulated sugar, brown sugar, cornstarch, and lemon zest. Pour in melted butter and stir gently. Spread evenly over the bottom of the prepared pan.
- In a separate bowl, whisk together flour, baking powder, baking soda, and salt.
- In a large bowl, beat softened butter with granulated sugar until light and fluffy, about 2-3 minutes.
- Beat in eggs, one at a time, mixing well after each. Add vanilla extract and almond extract if using. Mix until smooth.
- Add sour cream (or Greek yogurt) and milk. Beat until combined. The batter may look curdled; this is normal.
- Add dry ingredients to the wet mixture. Stir gently with a spatula until just combined. Do not overmix.
- Carefully dollop the batter over the blueberry layer and spread gently to cover the berries completely.
- Bake for 35-40 minutes, or until the top is golden and a toothpick inserted in the center comes out clean (a few blueberry streaks are fine, but no wet batter).
- Let the cake cool in the pan for 10-15 minutes. Run a knife around the edge to loosen. Place a plate or wire rack over the pan and flip the cake out. Remove the pan and peel away parchment if used.
- Let cool for at least 10 more minutes before slicing. Serve warm or at room temperature, optionally with vanilla ice cream or whipped cream.
Notes
For best results, use parchment paper to prevent sticking. Do not overmix the batter for a tender crumb. Let the cake cool for 10-15 minutes before flipping to avoid syrup running everywhere or sticking. You can use frozen blueberries straight from the freezer. For a gluten-free version, use a 1:1 gluten-free flour blend. Serve with vanilla ice cream or whipped cream for an extra treat.
- Prep Time: 20 minutes
- Cook Time: 35-40 minutes
- Category: Dessert
- Cuisine: American
Nutrition
- Serving Size: 1 slice (1/10th of cake)
- Calories: 270
- Sugar: 22
- Sodium: 160
- Fat: 10
- Saturated Fat: 6
- Carbohydrates: 38
- Fiber: 2
- Protein: 4
Keywords: blueberry upside down cake, summer dessert, easy cake, blueberry cake, upside down cake, picnic dessert, potluck dessert, fruit cake, homemade cake, berry cake