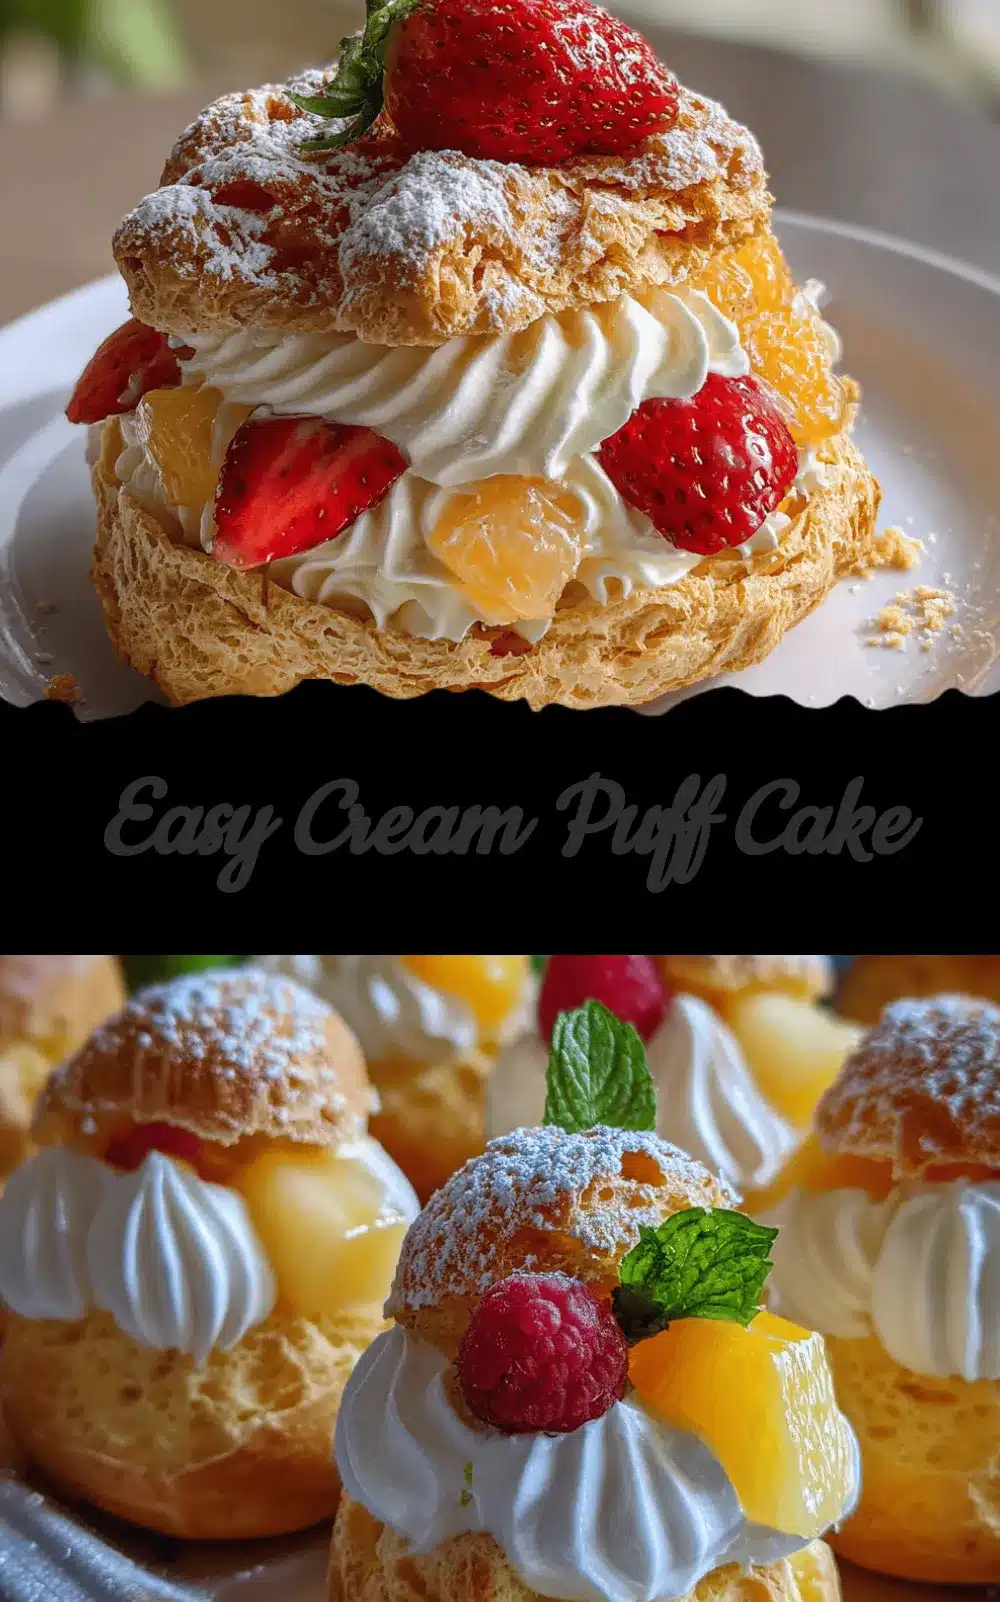
The first time I cut into a chilled cream puff cake, the soft pastry layers and dreamy vanilla filling made me pause and just breathe it all in. There’s something magic about the way the cool, creamy center settles into an airy puff crust—it’s like eating a cloud that’s been dipped in nostalgia. Honestly, if you’ve ever loved classic cream puffs (the kind you snag at a bakery and try not to eat all at once), you’re in for a treat with this cream puff cake recipe.
I stumbled across the idea for this dessert years ago when I wanted something showstopping for my family’s Sunday dinner but didn’t have time for fiddly pastries. Cream puff cake delivers all the best parts of a cream puff—rich custard, tender pastry, and a glossy chocolate finish—in a way that’s so much easier than you’d expect. No piping bags, no individual puffs, just one big cake that comes together in less than an hour.
This recipe has become a staple for birthdays, holidays, and those moments when I want to impress without stress. The cream puff cake is a hit with both kids and adults, thanks to its comforting flavor and irresistible texture. It’s especially perfect for busy families or anyone craving a homemade dessert that feels fancy but is secretly simple. Whether you’re a baking newbie or a seasoned dessert lover, this cake is worth adding to your recipe box. I’ve made it more times than I can count—always tweaking, always tasting—so you can trust these instructions to help you nail it every time.
Why You’ll Love This Recipe
- Quick & Easy: You can whip up this cream puff cake in about 45 minutes, so it’s perfect for last-minute gatherings or sweet cravings.
- Simple Ingredients: No fancy stuff here! Just everyday items you probably have on hand—eggs, butter, flour, milk, and instant pudding.
- Perfect for Any Occasion: Whether it’s brunch, a potluck, or a family celebration, this cake is a guaranteed crowd-pleaser. I’ve served it at everything from summer barbecues to Christmas dinner.
- Crowd-Pleaser: Every time I make this, people go back for seconds (sometimes thirds). Kids love the creamy filling, and adults appreciate its not-too-sweet flavor.
- Unbelievably Delicious: The combo of light pastry and silky custard is pure comfort food. It’s the kind of dessert that makes you close your eyes and savor every bite.
What sets my cream puff cake apart? I blend the pastry dough until it’s silky smooth—no lumps, no fuss. The filling is a mix of real whipped cream and instant pudding, which gives you a custard-like texture without standing at the stove forever. And let’s not forget the chocolate drizzle on top, which takes this cake from delicious to “where has this been all my life?”
Honestly, this recipe is all about balance: it’s indulgent, but not heavy; it’s impressive, but totally doable. If you’re looking for a dessert that makes you feel like a baking superstar without the headache, cream puff cake is it. It’s also a fantastic way to sneak in some family bonding—my kids love helping spread the filling and drizzle the chocolate. There’s just something about sharing a homemade dessert that brings everyone together.
Ingredients Needed
This cream puff cake recipe shines because it uses simple, wholesome ingredients for maximum flavor and that signature creamy texture. You won’t need anything fancy—just a handful of pantry staples and a few fridge basics.
- For the Pastry:
- 1 cup (240ml) water
- 1/2 cup (115g) unsalted butter (cut into chunks)
- 1 cup (120g) all-purpose flour
- 4 large eggs (room temperature)
- 1/4 tsp salt
- For the Filling:
- 2 cups (480ml) cold whole milk
- 2 (3.4 oz/96g each) boxes instant vanilla pudding mix (I like Jell-O brand for best flavor)
- 1 cup (240ml) heavy whipping cream
- 2 tbsp powdered sugar (optional, for extra sweetness)
- 1 tsp pure vanilla extract
- For the Topping:
- 1/2 cup (120ml) chocolate syrup or melted semi-sweet chocolate (for drizzling)
- Optional: 1/4 cup (25g) chopped toasted nuts (adds crunch)
Ingredient Notes & Substitutions:
- If you need a gluten-free option, use a gluten-free all-purpose flour blend—Bob’s Red Mill is my go-to for texture.
- No instant pudding? You can make a homemade custard, but it’ll take more time and patience. Trust me, instant pudding is a lifesaver here.
- For extra flavor, mix a little almond extract into the filling or sprinkle cinnamon into the pastry dough.
<lilactose a="" almond="" as="" but="" coconut="" cow’s="" cream="" dairy-free="" filling,="" for="" free?="" heavy="" instead="" it="" li="" milk="" milk.="" of="" set="" the="" thick="" use="" version.
I usually stick with classic vanilla, but sometimes swap in French vanilla or cheesecake flavor pudding mix for a twist. And if you’re in a pinch, canned whipped topping works instead of fresh cream—though homemade is always best! The topping is flexible too; use melted chocolate chips, ganache, or even a dusting of cocoa powder.
Equipment Needed
- 9×13-inch (23x33cm) baking pan (glass or metal)
- Medium saucepan (for pastry dough)
- Wooden spoon or silicone spatula
- Electric mixer or whisk (for filling and whipping cream)
- Mixing bowls (at least two, medium-sized)
- Measuring cups and spoons
- Parchment paper (optional, for lining the pan)
- Offset spatula or butter knife (for spreading filling)
If you don’t have a 9×13 pan, split the recipe into two 8×8 pans—works just fine, you’ll just have thicker layers. I’ve tried making this in a ceramic dish too; just keep an eye on the bake time since ceramic can heat differently. For whipping cream, I’ve used both a hand mixer and a whisk (when my mixer died mid-recipe—talk about arm workout!). Just takes a little more effort. And don’t stress about fancy chocolate drizzling tools; a spoon works perfectly well.
Maintenance tip: If you use nonstick pans, avoid metal spatulas—they scratch the surface and make cleanup rough. For budget-friendly mixing bowls, I’ve had great luck with basic glass sets from the dollar store. They’re sturdy, easy to clean, and won’t break the bank.
Preparation Method

- Preheat & Prep:
Preheat your oven to 400°F (205°C). Lightly grease your 9×13-inch baking pan or line with parchment paper for easy removal. - Make the Pastry Dough:
In a medium saucepan, combine 1 cup water, 1/2 cup butter, and 1/4 tsp salt. Heat over medium until the butter melts and the mixture just begins to boil (about 2-3 minutes).
Quickly add 1 cup flour all at once. Stir vigorously with a wooden spoon or spatula until a thick dough forms and pulls away from the sides of the pan (about 1 minute). Remove from heat.
Let the dough cool for 5 minutes—this prevents the eggs from scrambling when you add them next. - Blend in the Eggs:
Add eggs one at a time, mixing thoroughly after each addition. At first, the dough may look slippery or separated, but keep stirring—it’ll come together and turn glossy and smooth.
(Tip: I sometimes use an electric mixer on low for this step to make sure the eggs are fully incorporated.) - Bake the Pastry Base:
Spread the dough evenly into your prepared pan. It’ll look thin—don’t worry, it puffs up beautifully.
Bake for 25-30 minutes, or until the pastry is golden brown and puffed up. You’ll notice it forms a cratered, uneven surface (that’s what you want!).
Remove from oven and let cool completely in the pan. (Warning: Don’t poke or press the pastry—let it deflate naturally.) - Prepare the Filling:
In a large mixing bowl, whisk together 2 cups cold milk and the instant pudding mixes. Beat for 2 minutes until thickened.
In a separate bowl, whip 1 cup heavy cream with 2 tbsp powdered sugar and 1 tsp vanilla until stiff peaks form (about 2-3 minutes with a mixer).
Gently fold the whipped cream into the pudding mixture. The filling should be fluffy and creamy—if it’s runny, chill for 10 minutes to thicken. - Assemble the Cake:
Once the pastry base is cool, spread the filling evenly over the top. Use an offset spatula or the back of a spoon for smooth coverage.
Chill the cake in the fridge for at least 2 hours (overnight is best for firm slices). - Add the Topping:
Before serving, drizzle chocolate syrup or melted chocolate over the chilled cake. Sprinkle nuts if using.
Slice into squares and serve cold.
Troubleshooting Tips:
- If the pastry doesn’t puff, check your oven temp and make sure eggs are room temp—cold eggs can prevent full rise.
<liif 10-15="" assembling.
<liif a="" along="" before="" butter="" cake="" edges="" knife="" li="" lifting="" out="" pan,="" run="" slices.
Personal tip: I usually make the pastry and filling the night before, then add the chocolate topping just before serving. This makes party prep a breeze!
Cooking Tips & Techniques
Having made cream puff cake more times than I can count, I’ve picked up a few secrets that keep things delicious (and drama-free). Let’s face it, even easy desserts can throw curveballs.
- Don’t Overmix the Dough: When you add the eggs, mix just until the dough looks glossy and smooth. Overmixing can make the pastry dense instead of airy.
- Cool Completely Before Filling: The pastry needs to be cool, or the filling will melt and get soupy. I’ve rushed this step before—trust me, patience pays off!
- Whip Cream to Stiff Peaks: Don’t stop at soft peaks—keep whipping until the cream holds its shape. Otherwise, the filling won’t set firmly.
- Chill for Clean Slices: The longer the cake chills, the easier it is to cut neat squares. Overnight is ideal, but 2 hours minimum works in a pinch.
- Chocolate Drizzle Technique: If using melted chocolate, let it cool for a minute before drizzling so it doesn’t melt the filling. Use a spoon or fork for fun zig-zags!
Common mistakes? I’ve forgotten to cool the pastry (result: runny mess), and once swapped in low-fat milk for the filling—didn’t set at all. Now I stick with whole milk and double-check the chill time. Efficiency tip: Make the filling while the pastry bakes, then clean up while the cake chills. Multitasking saves time and keeps the kitchen less chaotic.
For consistent results, always measure ingredients carefully and use room-temperature eggs. If you want extra crunch, add a layer of sliced strawberries or toasted nuts on top. And don’t stress if the pastry sinks a bit after baking—that’s normal and makes a perfect “well” for the creamy filling.
Variations & Adaptations
Cream puff cake is super adaptable, so don’t be shy about customizing it to suit your needs or tastes. Here are some of my favorite twists:
- Gluten-Free Version: Swap the all-purpose flour for a gluten-free blend. The pastry might puff a little less, but the texture is still light and delicious.
- Chocolate Lovers: Use chocolate pudding instead of vanilla, and drizzle with white chocolate for a striking look.
- Berry Bliss: Add a layer of fresh sliced strawberries or raspberries between the pastry and filling. You can also fold chopped berries into the filling for a fruity pop.
- Dairy-Free Option: Use almond milk for the pudding and coconut cream for whipping. (Note: Instant pudding may not set as firmly with non-dairy milk—go thicker if needed.)
- Nutty Crunch: Sprinkle toasted hazelnuts or pecans on top for a grown-up twist.
- Seasonal Touch: In fall, add a teaspoon of cinnamon or pumpkin pie spice to the filling for a cozy flavor.
Personally, I love making a half-and-half cake: one side classic vanilla, the other side with berries and nuts. It’s perfect for parties with picky eaters! And if you’re feeling adventurous, try mini cream puff cakes in cupcake tins for individual servings. They’re adorable and totally portable—great for picnics or bake sales.
Serving & Storage Suggestions
Cream puff cake is best served cold, straight from the fridge. The pastry stays tender, and the filling keeps its dreamy texture. For presentation, slice into squares and drizzle extra chocolate over each piece—sometimes I add a dollop of whipped cream or fresh berries on top for color.
- Serve with:
- Hot coffee or espresso
- Fresh fruit salad (the tartness balances the sweet filling)
- Glass of cold milk (classic combo!)
- Storage:
- Refrigerator: Store covered for up to 3 days. The pastry softens over time but the flavor gets even richer.
- Freezer: Wrap tightly and freeze for up to 1 month. Thaw overnight in the fridge before serving.
- Reheating:
- Not recommended—cream filling doesn’t hold up to heat. Serve cold for best results.
Flavor tip: The cake actually tastes better on day two, once the filling has set and the flavors meld together. If you notice moisture in the pan, just dab with a paper towel before serving. I’ve even packed slices in lunchboxes—just keep them chilled until ready to eat.
Nutritional Information & Benefits
Each serving (about 1/12 of the cake) is roughly 260 calories, with 15g fat, 24g carbs, and 6g protein. The eggs and milk add a nice protein boost, while the pastry and filling provide comforting carbs for energy.
Key benefits? This dessert is lower in sugar than many cakes, thanks to the pudding filling and optional reduced-sugar chocolate topping. Using real whipped cream (instead of cool whip) gives you healthy fats and a richer texture. Gluten-free and dairy-free adaptations make it friendly for lots of diets—just watch out for potential allergens in flour, milk, and nuts.
I love that cream puff cake offers a lighter dessert option that doesn’t sacrifice flavor or satisfaction. It fits beautifully into family celebrations while still letting you make smart choices for health and wellness.
Conclusion
If you’re searching for a dessert that feels special but doesn’t demand hours in the kitchen, cream puff cake is the answer. It’s got everything: airy pastry, creamy filling, and that irresistible chocolate drizzle. Plus, it’s a recipe you can truly make your own—mix up flavors, add toppings, or tweak for dietary needs.
I come back to this cake again and again because it’s reliable, delicious, and always gets a smile (even from picky eaters!). It’s a little imperfect—sometimes the pastry sinks, sometimes the drizzle is messy—but honestly, that’s part of its charm. I hope you’ll give it a try, tweak it for your family, and share your results below.
Let me know how your cream puff cake turns out! Drop a comment, share your favorite twists, or tag me with your creations. Happy baking—and may every slice bring a little more joy to your table!
Frequently Asked Questions
Can I make cream puff cake ahead of time?
Absolutely! You can prepare the pastry and filling a day in advance. Assemble, chill overnight, and add the chocolate topping right before serving for best results.
Can I use a different flavor of pudding?
Yes, chocolate, cheesecake, or even pistachio pudding work great. Just keep the same measurements and chill thoroughly so the filling sets.
Why didn’t my pastry puff up?
Check your oven temperature and make sure you added the eggs one at a time. Cold eggs or low oven heat can prevent proper puffing.
Is cream puff cake gluten-free?
It can be! Substitute the all-purpose flour with a gluten-free blend. Just note the pastry may be a little less airy, but it’s still tasty.
How long will leftovers last in the fridge?
Stored covered, cream puff cake lasts up to 3 days. The texture softens, but the flavor actually improves over time!
Pin This Recipe!

Cream Puff Cake
- Total Time: 45 minutes (plus 2 hours chilling)
- Yield: 12 servings 1x
Description
This easy homemade cream puff cake combines airy pastry, creamy vanilla filling, and a chocolate drizzle for a showstopping dessert that’s simple to make and loved by all ages. It’s perfect for celebrations, potlucks, or any time you want a comforting treat without the fuss of classic cream puffs.
Ingredients
- 1 cup water
- 1/2 cup unsalted butter, cut into chunks
- 1 cup all-purpose flour
- 4 large eggs, room temperature
- 1/4 tsp salt
- 2 cups cold whole milk
- 2 (3.4 oz) boxes instant vanilla pudding mix
- 1 cup heavy whipping cream
- 2 tbsp powdered sugar (optional)
- 1 tsp pure vanilla extract
- 1/2 cup chocolate syrup or melted semi-sweet chocolate (for drizzling)
- 1/4 cup chopped toasted nuts (optional, for topping)
Instructions
- Preheat oven to 400°F (205°C). Lightly grease a 9×13-inch baking pan or line with parchment paper.
- In a medium saucepan, combine water, butter, and salt. Heat over medium until butter melts and mixture just begins to boil (about 2-3 minutes).
- Quickly add flour all at once. Stir vigorously until a thick dough forms and pulls away from the sides (about 1 minute). Remove from heat and let cool for 5 minutes.
- Add eggs one at a time, mixing thoroughly after each addition until dough is glossy and smooth.
- Spread dough evenly into prepared pan. Bake for 25-30 minutes, until golden brown and puffed. Remove and let cool completely in the pan.
- In a large bowl, whisk together cold milk and pudding mixes for 2 minutes until thickened.
- In a separate bowl, whip heavy cream with powdered sugar and vanilla until stiff peaks form (about 2-3 minutes).
- Gently fold whipped cream into pudding mixture. Chill filling for 10 minutes if runny.
- Spread filling evenly over cooled pastry base. Chill cake in fridge for at least 2 hours (overnight is best).
- Before serving, drizzle chocolate syrup or melted chocolate over cake. Sprinkle nuts if desired.
- Slice into squares and serve cold.
Notes
For gluten-free, use a GF flour blend. Almond milk and coconut cream work for dairy-free, but filling may be softer. Chill cake overnight for best slices. Add berries or nuts for variation. Don’t overmix dough; cool pastry fully before filling. Cake tastes even better on day two.
- Prep Time: 15 minutes
- Cook Time: 30 minutes
- Category: Dessert
- Cuisine: American
Nutrition
- Serving Size: 1/12 of cake
- Calories: 260
- Sugar: 12
- Sodium: 220
- Fat: 15
- Saturated Fat: 9
- Carbohydrates: 24
- Fiber: 1
- Protein: 6
Keywords: cream puff cake, easy dessert, vanilla pudding, chocolate drizzle, potluck dessert, homemade cake, bakery-style, crowd-pleaser, family recipe