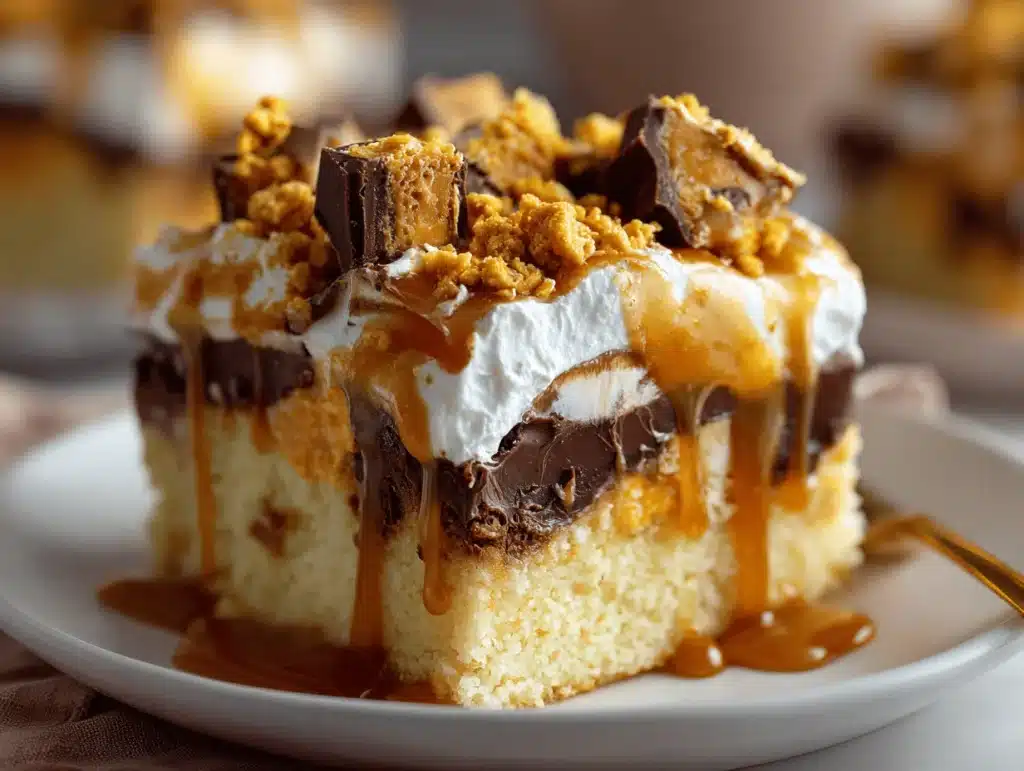
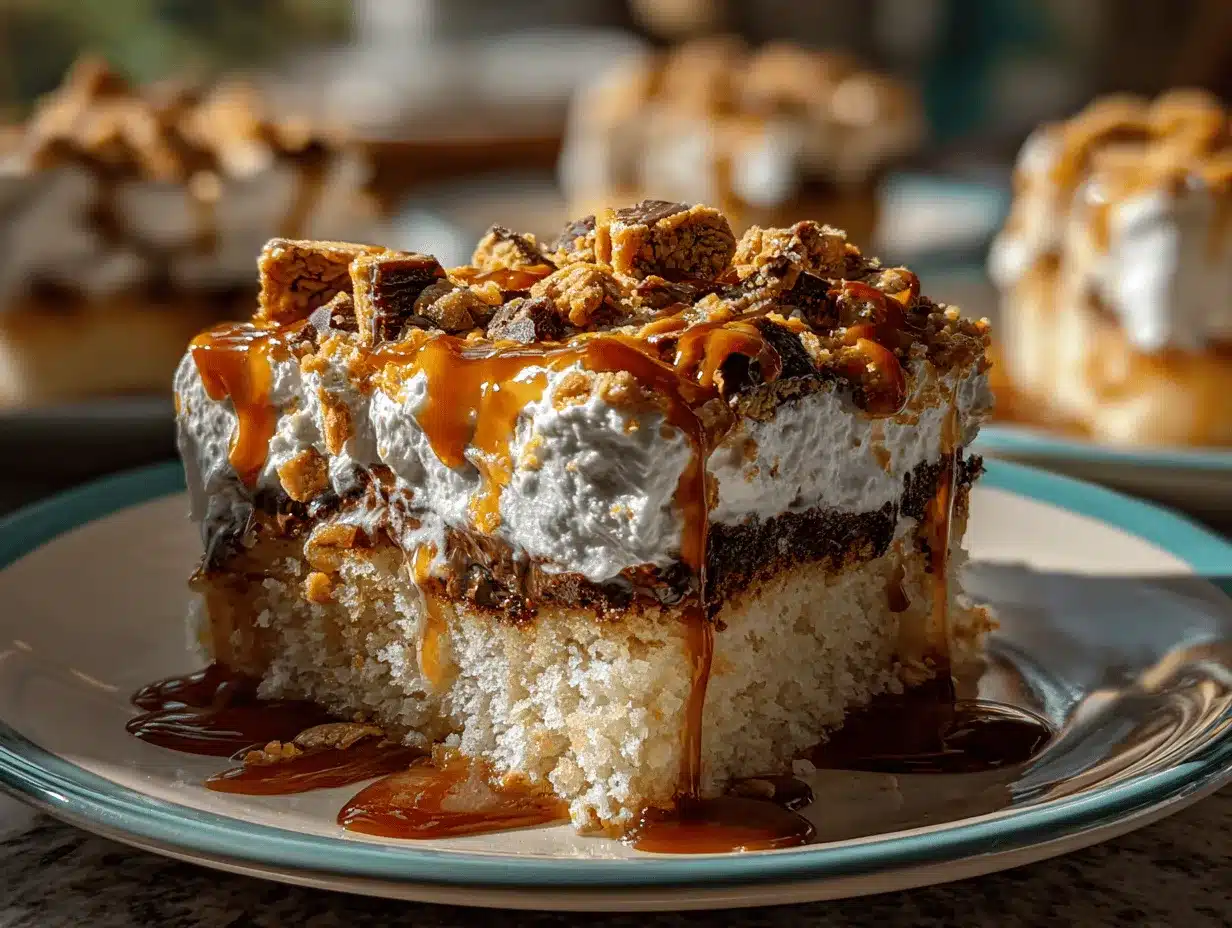
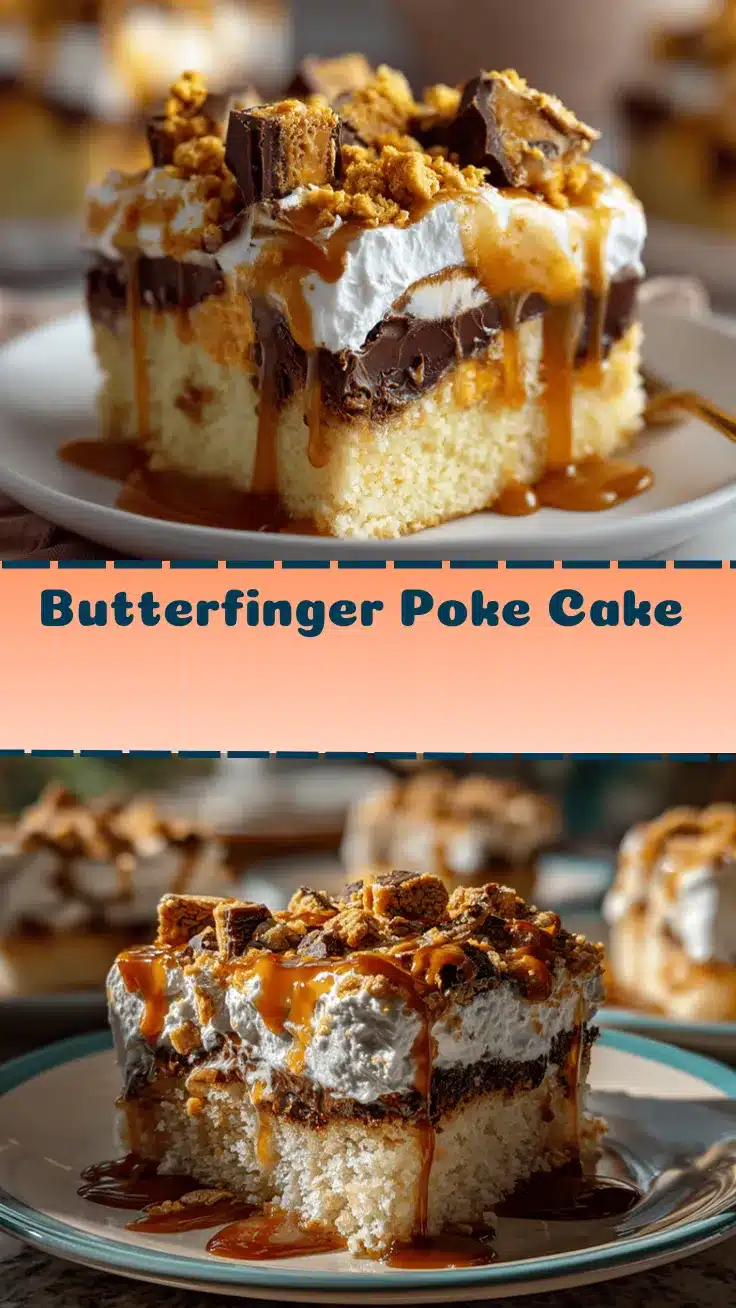
Crunchy, creamy, and unapologetically chocolatey—this Butterfinger poke cake is the kind of dessert that makes you sneak a second slice before anyone’s looking. The first time I made this cake, the kitchen smelled like a candy shop, and the anticipation was almost unbearable! There’s something about the combo of moist chocolate cake, silky caramel, and those signature Butterfinger bits that just hits every sweet spot. Honestly, if you’re a fan of classic poke cakes, this one takes things to a whole new level of deliciousness.
I stumbled onto this recipe because my family’s totally obsessed with Butterfinger bars (we fight over the last piece at Halloween, no joke), and I wanted a party treat that would wow the crowd without demanding hours of fuss. After a few tweaks—like making sure the cake layers stayed extra moist and the topping was just right—it’s become our go-to for birthdays, BBQs, and random Tuesday nights. The best part? It’s so easy, you can whip it up with pantry staples and a handful of simple tools. Whether you’re baking for picky kids, chocolate lovers, or your own late-night cravings, this Butterfinger poke cake delivers every time. You don’t have to be a pro baker to get rave reviews; trust me, I’ve put this recipe through its paces more than a dozen times!
If you’re looking for a dessert that’s rich, satisfying, and a little over-the-top (in the best way), you’re in for a treat. This Butterfinger poke cake isn’t just a recipe—it’s a sweet memory waiting to happen. Let’s get into all the crave-worthy details that make this cake so special, and why you’ll find yourself making it again and again.
Why You’ll Love This Butterfinger Poke Cake Recipe
- Quick & Easy: From start to finish, you can have this cake ready in under an hour (plus a bit of chill time for the poke magic). Perfect for those last-minute party invites or when you just need a sweet fix.
- Simple Ingredients: No need for fancy baking skills or specialty shopping trips—most of the ingredients are already in your pantry or fridge.
- Perfect for Parties: This cake is a showstopper at birthdays, potlucks, and family gatherings. People always ask for the recipe, and leftovers are basically nonexistent.
- Crowd-Pleaser: Kids love the candy crunch, adults can’t resist the creamy layers, and even the non-dessert folks will sneak a slice (or two).
- Unbelievably Delicious: The combination of moist chocolate cake, caramel drizzle, whipped topping, and Butterfinger pieces creates an irresistible texture and flavor that’s pure comfort food.
If you’re wondering what makes this Butterfinger poke cake stand out from the rest, it’s all about the details. I blend the caramel and sweetened condensed milk together for a filling that seeps into every bite, keeping the cake moist and gooey in the best way. The crushed Butterfinger bars on top add a satisfying crunch that pairs perfectly with the creamy whipped topping—seriously, it’s impossible to get bored of this flavor combo.
Let’s face it: life’s too short for boring cake. This recipe’s been tested on picky eaters, chocolate fanatics, and even those who “aren’t really into dessert”—and it wins every time. The moist layers make it feel indulgent, but it’s simple enough to whip up on a weeknight. Whether you’re a poke cake newbie or a seasoned baker, this Butterfinger poke cake is bound to become a staple in your kitchen. I’ve made countless versions, and this one is, hands down, my favorite.
Ingredients Needed
This Butterfinger poke cake uses easy-to-find ingredients that come together for a showstopping dessert. You probably have most of these on hand already, and if you don’t, there’s plenty of room for substitutions.
- Chocolate cake mix (15.25 oz box) – Any brand works, but I prefer Duncan Hines or Betty Crocker for reliable results. You can use homemade chocolate cake if you’re feeling fancy.
- Eggs (3 large, room temperature) – Helps the cake rise and gives it a tender crumb.
- Vegetable oil (1/2 cup / 120 ml) – Adds moisture; you can swap for melted butter if you want a richer flavor.
- Water (1 cup / 240 ml) – Combines with the cake mix to create that classic texture.
- Sweetened condensed milk (1 can / 14 oz / 396 g) – The secret to ultra-moist poke cake! It soaks into the holes for a creamy finish.
- Creamy caramel sauce (1 cup / 240 ml) – You can use store-bought or homemade; I love Smucker’s or Trader Joe’s. (Thicker is better!)
- Whipped topping (8 oz / 227 g tub, thawed) – Cool Whip is the classic choice, but homemade whipped cream works too. For dairy-free, use coconut whipped topping.
- Butterfinger candy bars (4 regular size / 2.1 oz / 60 g each, crushed) – I use a zip-top bag and rolling pin; you want chunks and crumbs for perfect texture.
- Optional toppings:
- Chocolate syrup (for extra drizzle)
- Mini chocolate chips (for a little extra crunch)
- Chopped roasted peanuts (if you want a salty twist)
Ingredient Tips: For the cake mix, you can use devil’s food, chocolate fudge, or even yellow cake if you want a lighter base. If you’re gluten-free, swap in a gluten-free cake mix. For the caramel, a thick sauce works best—it doesn’t run all over the place and gives each bite a gooey richness. Butterfinger bars are essential, but you can use any chocolate-peanut butter candy if you’re in a pinch (Reese’s, Heath, or even Snickers chopped up).
Substitution Notes: Want to make it dairy-free? Use coconut-based condensed milk and whipped topping. No caramel sauce? Try dulce de leche or a thick butterscotch sauce. The recipe is super forgiving and totally customizable to whatever you have on hand.
Equipment Needed
- 9×13-inch (23×33 cm) baking pan: Glass or metal both work, but I prefer glass for even baking and easy clean-up.
- Large mixing bowl: For mixing the cake batter.
- Electric mixer or whisk: Either one gets the job done. I’ve used both and honestly, a whisk is fine if you don’t mind a little arm workout.
- Wooden spoon or spatula: For folding and spreading batter, and later for the toppings.
- Measuring cups and spoons: Accuracy keeps things consistent!
- Fork or wooden skewer: For poking holes in the cake (I prefer a wooden spoon handle for big, clean holes that soak up all the goodness).
- Zip-top bag & rolling pin: For crushing Butterfinger bars (you can also use a food processor, but that’s extra dishes).
If you don’t have a 9×13 pan, split the batter between two 8-inch pans for a layered effect. For crushing the candy, a rolling pin is my go-to, but honestly, a sturdy mug works in a pinch. And if you’re missing an electric mixer, a little elbow grease with a whisk gets the job done. Just don’t skip poking the holes—this step is key for that dreamy, moist texture!
Maintenance tip: If you’re using metal pans, line them with parchment for easier clean-up and less sticking. Glass pans are more forgiving, and they’re easy to wash.
Budget-friendly option: Most of these tools are available at dollar stores or big box retailers, and you can always improvise with household items (I’ve used a chopstick for poking holes more than once!).
Preparation Method
- Preheat & Prep: Preheat your oven to 350°F (175°C). Lightly grease a 9×13-inch (23×33 cm) baking pan—use butter, nonstick spray, or parchment paper.
- Mix the Cake Batter: In a large bowl, combine the chocolate cake mix, 3 eggs, 1/2 cup (120 ml) vegetable oil, and 1 cup (240 ml) water. Mix until smooth and glossy, about 2 minutes with an electric mixer on medium speed (or 3 minutes by hand). The batter should be thick but pourable. If it looks dry, add an extra tablespoon of water.
- Bake: Pour the batter into your prepared pan and spread evenly. Bake for 28-32 minutes, or until a toothpick inserted into the center comes out clean. The top should be springy and smell like rich chocolate. Let the cake cool in the pan for 10-15 minutes. (Don’t rush; poking while it’s too hot can make it gummy.)
- Poke Holes: Once cooled slightly, use the handle of a wooden spoon, a fork, or a chopstick to poke holes all over the cake—about 1 inch (2.5 cm) apart. Go deep, but don’t punch through the bottom. The holes should be big enough to soak up the filling.
- Make the Filling: In a medium bowl, stir together 1 can (14 oz / 396 g) sweetened condensed milk and 1 cup (240 ml) caramel sauce. Pour this mixture slowly over the cake, aiming to fill each hole. Use a spatula to smooth it out if needed. Let the cake sit for 10-15 minutes so the filling soaks in (the top will look glossy and sticky).
- Add the Whipped Topping: Once the cake has cooled to room temperature, spread the thawed whipped topping (8 oz / 227 g) evenly over the surface. Use a spatula for super smooth coverage. If you want extra height, whip up some homemade cream and fold it in.
- Crush & Sprinkle Butterfinger: Place 4 Butterfinger bars in a zip-top bag and crush them with a rolling pin (or your hands). Scatter the crushed candy over the whipped topping. The mix of crumbs and larger pieces gives the best texture.
- Optional Finishing Touches: Drizzle chocolate syrup, add mini chocolate chips, or toss on some chopped peanuts if you like a salty-sweet finish.
- Chill & Serve: Refrigerate the cake for at least 2 hours before serving. This helps the filling set and the flavors meld. Slice into squares and serve chilled for the ultimate experience.
Troubleshooting Tips: If your cake seems dry, poke extra holes and add a bit more filling. If the whipped topping is sliding, chill the cake for an extra hour to let things firm up. Don’t skip the chilling time—it makes all the difference!
Prep Notes: Be generous with the Butterfinger layer; more is always better. If you want super clean slices, wipe your knife between cuts and serve immediately after removing from the fridge.
Efficiency Tip: Bake the cake a day ahead, poke and fill, then top and chill overnight. The flavors only get better!
Cooking Tips & Techniques
Making Butterfinger poke cake is pretty straightforward, but a few pro tips can help you get perfect results every time.
- Poke Strategically: Use a thick tool (like a wooden spoon handle) to make wide, deep holes. This lets the filling soak into every bite, instead of just sitting on top.
- Don’t Overbake: Check the cake at the minimum baking time—overbaking dries out the base, making it harder for the filling to soak in. If your oven runs hot, shave off a couple of minutes.
- Filling Pour: Pour the condensed milk and caramel mixture slowly, letting it seep into each hole. If you rush, it’ll pool on top and miss the inside.
- Chill Time Matters: The cake needs time in the fridge so the layers can set and the flavors meld. I learned this the hard way—served too soon, everything slides around and tastes a little too sweet.
- Butterfinger Crunch: Crush the candy right before topping so it stays crunchy. If you prep it too far in advance, the pieces can get soggy.
- Personal Lessons: Once, I used a fork to poke the cake, and the holes were too small—most of the filling sat on top. I switched to a wooden spoon handle, and it was a game-changer for texture.
Timing is key—while the cake bakes, crush your candy bars and prep the filling. This multitasking saves time and keeps you organized. Consistency comes from measuring ingredients accurately and letting the cake chill as directed. If you’re making it for a crowd, double the batch and use two pans; the method stays the same.
Variations & Adaptations
This Butterfinger poke cake is endlessly customizable. Here are some of my favorite twists and adaptations:
- Gluten-Free: Swap the regular cake mix for a gluten-free chocolate cake mix. All other ingredients are naturally gluten-free (just double-check the labels).
- Dairy-Free: Use coconut or almond-based condensed milk and opt for dairy-free whipped topping. Many caramel sauces are dairy-free, but check before using.
- Seasonal Flavor: In fall, add a teaspoon of pumpkin spice to the cake batter and swap half the caramel for pumpkin puree. Top with chopped pecans for a cozy, autumn vibe.
- Candy Swap: Not a Butterfinger fan? Try chopped Heath bars, Reese’s cups, or Snickers for a different twist. Each candy gives its own unique crunch and flavor.
- Cooking Method: Make cupcakes instead of a sheet cake—just poke holes with a chopstick and drizzle the filling over each one. They’re perfect for portion control at parties.
- Personal Favorite: I once layered the bottom with a thin spread of peanut butter before pouring in the filling. The salty-sweet mix was addictive!
Allergen swaps are easy: for nut allergies, skip the peanuts and stick to pure Butterfinger. For egg allergies, use an egg replacer or applesauce in the cake mix. The recipe is super forgiving—don’t be afraid to experiment and find your perfect combo.
Serving & Storage Suggestions
This Butterfinger poke cake is best served chilled—straight from the fridge, it’s cool, creamy, and the topping stays crunchy. For a party, slice into neat squares, and sprinkle a few extra Butterfinger pieces or a drizzle of chocolate syrup right before serving for extra wow.
Pair with a cold glass of milk, a mug of coffee, or even a scoop of vanilla ice cream for the ultimate dessert experience. If you’re serving it at brunch, go wild and pair it with fresh berries or whipped cream.
Storage: Cover the cake tightly with plastic wrap or a lid and store in the refrigerator for up to 4 days. The flavors deepen as it sits, and the cake stays moist. For longer storage, freeze individual slices in an airtight container for up to 2 months—just thaw overnight in the fridge.
To reheat (if you want a warm treat), microwave a slice for 10-15 seconds, but honestly, it’s best cold. The Butterfinger topping gets a little softer over time, but the flavor stays spot-on.
Tip: If you want to keep the topping crunchy for days, store extra Butterfinger pieces in a separate container and sprinkle them on right before serving.
Nutritional Information & Benefits
Estimated per serving (1/15th of cake):
- Calories: 390
- Fat: 18g
- Carbs: 54g
- Protein: 4g
- Sugar: 38g
This Butterfinger poke cake is pure comfort food—rich, a little decadent, but surprisingly simple to adapt for different dietary needs. Chocolate cake brings mood-boosting cocoa, while the protein in eggs and nuts adds a tiny wellness boost. You can make it gluten-free or dairy-free with easy swaps.
Allergen Note: Contains eggs, dairy, peanuts, and wheat (unless adapted). For nut allergies, skip the optional peanuts and stick with Butterfinger bars alone.
From a wellness perspective, desserts like this are all about balance and joy. I love sharing this cake because it brings people together and makes any occasion feel special—even if you’re just celebrating the end of a long week!
Conclusion
So, if you’re looking for a party-worthy dessert that’s easy, crazy delicious, and just a little bit nostalgic, this Butterfinger poke cake is the answer. The layers of moist chocolate cake, caramel filling, fluffy whipped topping, and crunchy Butterfinger bits are a combo you’ll crave again and again.
Feel free to switch up the flavors, adjust the toppings, and make it your own—this recipe is all about fun and flexibility. Whether you’re baking for a crowd or just treating yourself, it’s guaranteed to earn rave reviews and happy smiles.
Personally, I love this cake because it’s my ultimate comfort treat—simple, satisfying, and always a hit with family and friends. Give it a try and let me know how you make it special! Drop a comment below, share your favorite adaptation, or even tag me on Pinterest with your creation. Life’s short—make dessert memorable!
Frequently Asked Questions
How do I keep my Butterfinger poke cake from getting soggy?
Make sure to chill the cake after adding the filling so it sets properly. Don’t overdo the caramel mixture—stick to the recommended amounts, and always spread the whipped topping after the cake has cooled.
Can I make Butterfinger poke cake ahead of time?
Absolutely! Bake, poke, and fill the cake up to a day ahead. Top with whipped cream and Butterfinger pieces right before serving for the freshest crunch.
What’s the best way to crush Butterfinger bars?
I put them in a zip-top bag and use a rolling pin. You want a mix of crumbs and small chunks for the best texture. Avoid crushing too far in advance, or they’ll get sticky.
Can I use homemade whipped cream instead of Cool Whip?
Yes! Fresh whipped cream is delicious, just make sure it’s stiff enough to hold up on the cake. For a lighter version, fold in a little vanilla yogurt.
Is Butterfinger poke cake freezer-friendly?
It sure is. Slice and freeze individual pieces in airtight containers. Thaw in the fridge overnight. The topping may soften a bit, but the cake still tastes amazing!
Pin This Recipe!

Butterfinger Poke Cake
- Total Time: 2 hours 45 minutes
- Yield: 15 servings 1x
Description
This easy Butterfinger poke cake combines moist chocolate cake, creamy caramel filling, fluffy whipped topping, and crunchy Butterfinger bits for a decadent dessert perfect for parties or family gatherings. It’s quick to make, crowd-pleasing, and endlessly customizable.
Ingredients
- 1 box (15.25 oz) chocolate cake mix
- 3 large eggs, room temperature
- 1/2 cup vegetable oil
- 1 cup water
- 1 can (14 oz) sweetened condensed milk
- 1 cup creamy caramel sauce
- 1 tub (8 oz) whipped topping, thawed
- 4 Butterfinger candy bars (2.1 oz each), crushed
- Optional: chocolate syrup, mini chocolate chips, chopped roasted peanuts
Instructions
- Preheat oven to 350°F (175°C). Lightly grease a 9×13-inch baking pan.
- In a large bowl, combine chocolate cake mix, eggs, vegetable oil, and water. Mix until smooth and glossy, about 2 minutes with an electric mixer or 3 minutes by hand.
- Pour batter into prepared pan and spread evenly. Bake for 28-32 minutes, or until a toothpick inserted in the center comes out clean. Let cake cool in pan for 10-15 minutes.
- Once slightly cooled, use the handle of a wooden spoon, fork, or chopstick to poke holes all over the cake, about 1 inch apart.
- In a medium bowl, stir together sweetened condensed milk and caramel sauce. Pour mixture slowly over cake, filling each hole. Use a spatula to smooth. Let cake sit for 10-15 minutes to soak.
- Once cake is at room temperature, spread whipped topping evenly over the surface.
- Crush Butterfinger bars in a zip-top bag with a rolling pin. Scatter crushed candy over whipped topping.
- Optional: Drizzle chocolate syrup, add mini chocolate chips, or chopped peanuts.
- Refrigerate cake for at least 2 hours before serving. Slice into squares and serve chilled.
Notes
For best results, chill the cake for at least 2 hours before serving. Use a wooden spoon handle for larger holes to soak up more filling. Crush Butterfinger bars just before topping to keep them crunchy. You can make the cake a day ahead and add toppings before serving. For gluten-free or dairy-free adaptations, use appropriate cake mix and toppings.
- Prep Time: 15 minutes
- Cook Time: 30 minutes
- Category: Dessert
- Cuisine: American
Nutrition
- Serving Size: 1/15th of cake (about 1 square)
- Calories: 390
- Sugar: 38
- Sodium: 350
- Fat: 18
- Saturated Fat: 7
- Carbohydrates: 54
- Fiber: 2
- Protein: 4
Keywords: Butterfinger poke cake, chocolate cake, party dessert, easy cake, caramel cake, candy bar cake, potluck dessert, birthday cake