Introduction
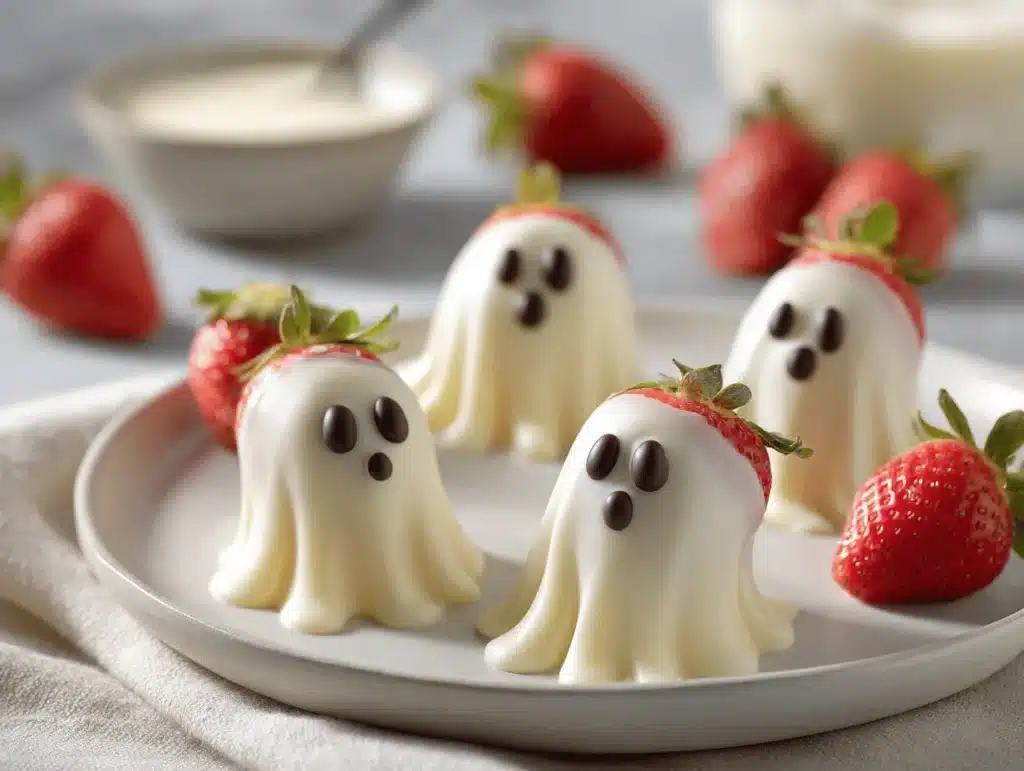
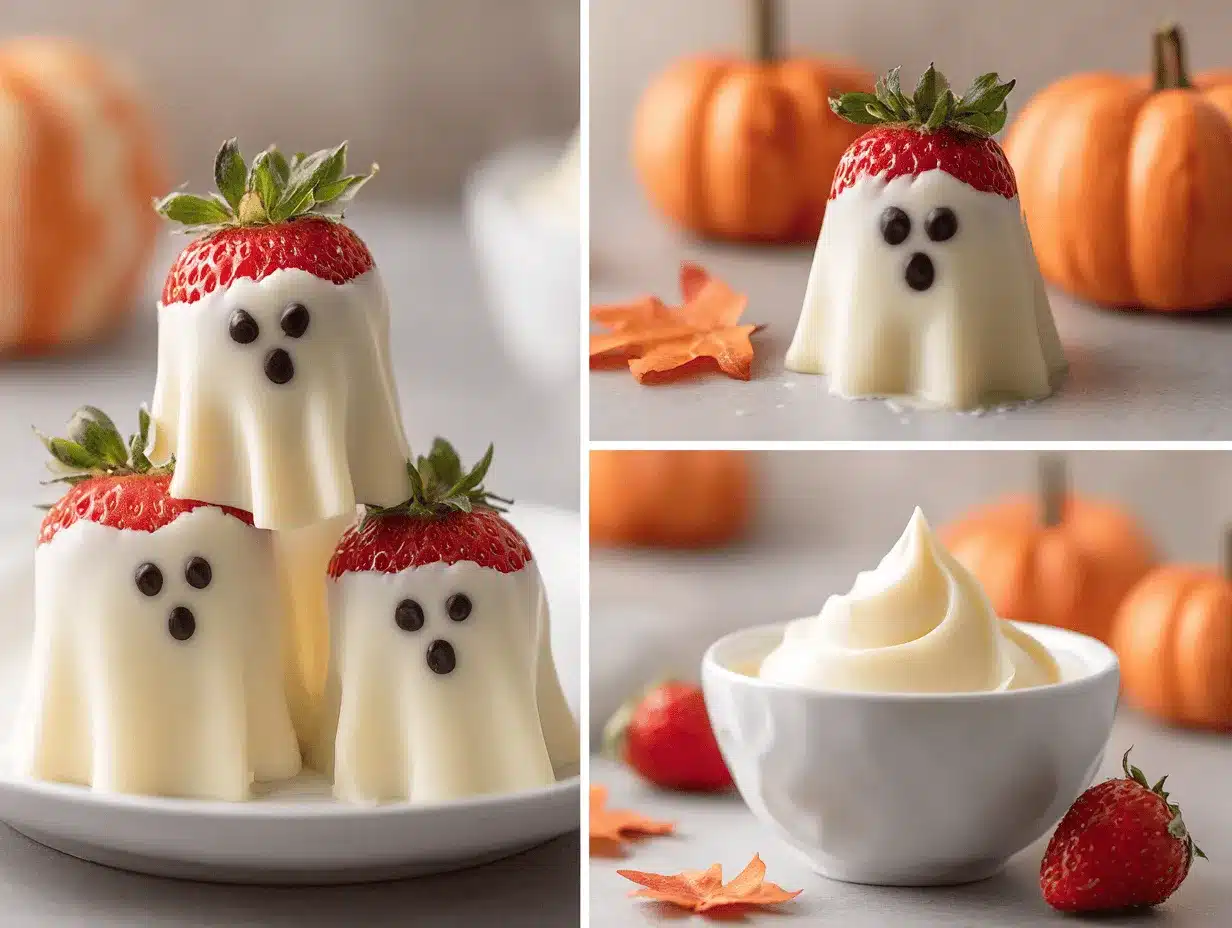
Spooky, sweet, and almost too adorable to eat—these white chocolate strawberry ghosts are one of my all-time favorite Halloween treats. The first time I made them was on a rainy October afternoon with my niece, who couldn’t stop giggling as we painted on the little ghostly faces. Trust me, there’s nothing quite like dipping fresh strawberries into creamy white chocolate and watching them transform into playful ghosts right before your eyes. The best part? You don’t even need to be a pro baker to nail this recipe.
Honestly, Halloween treats don’t get much easier or more fun than this. If you’ve ever struggled to find something festive that doesn’t require hours of decorating or a mountain of ingredients, these strawberry ghosts will be your new go-to. Not only do they look magical on a party platter, but they’re also a lighter alternative to the usual candy overload. Plus, the combo of juicy strawberries and smooth white chocolate is just irresistible.
I’ve tested this recipe more times than I can count—trying out different chocolates, experimenting with toppings, and even making dairy-free versions for my friends. Whether you’re hosting a spooky bash, prepping treats for school, or just want to surprise your family with something fun, white chocolate strawberry ghosts are the answer. These little ghosts have become a tradition in my house, and I can’t wait for you to give them a try. Grab your berries and let’s make some Halloween magic!
Why You’ll Love This Recipe
- Quick & Kid-Friendly: You can whip up a batch of white chocolate strawberry ghosts in under 30 minutes—perfect for those last-minute party preps or spontaneous kitchen fun.
- Simple Ingredients: No complicated shopping required. Just strawberries, white chocolate, and a few extras you probably already have (seriously, these are pantry staple level).
- Show-Stopping Presentation: They’re a hit at Halloween parties, school events, and cozy movie nights. Kids love decorating the faces, and adults love sneaking seconds.
- Unbeatable Flavor Combo: The juicy burst of strawberry paired with velvety white chocolate? It’s a match made in Halloween heaven.
- Healthier Than Most Treats: You get real fruit in every bite, so it’s a sweet treat with a little less guilt.
- Minimal Mess: No baking, no complicated steps—just dip, decorate, and enjoy.
What sets these white chocolate strawberry ghosts apart from other Halloween desserts is the pure simplicity. The trick is in the details: using high-quality white chocolate for a smooth coating, and making sure your strawberries are dry (so the chocolate sticks perfectly). I’ve tried a lot of Halloween treats over the years, and these always come out on top—crispy chocolate shell, juicy berry inside, and those playful ghost faces that make everyone smile. Plus, you can customize the expressions—happy, spooky, silly—it’s all up to you!
This is one of those recipes that brings people together. Whether you’re making them with your kids, friends, or just for yourself (no shame!), you’ll end up with a tray full of ghosts that are almost too cute to eat. But let’s be real—once you taste that combo, you won’t be able to resist. Every year, my family asks for these, and I love seeing them disappear off the plate faster than any store-bought treat. Trust me, these ghosts will haunt your Halloween in the best way!
Ingredients Needed
This recipe uses just a handful of ingredients, but each one plays a key role in flavor and presentation. Most are easy to find, and you can swap or tweak for dietary needs or personal taste. Here’s what you’ll need to conjure up your own batch of white chocolate strawberry ghosts:
- Fresh strawberries (about 1 pound / 450g, washed and thoroughly dried; medium to large berries work best for ghost shapes)
- White chocolate chips or melting wafers (12 ounces / 340g; I recommend Ghirardelli or Callebaut for smooth coating)
- Coconut oil (1-2 teaspoons; optional, helps thin the chocolate for easy dipping)
- Mini chocolate chips (for ghost eyes; you’ll need about 40 chips for 20 ghosts)
- Black decorating gel or melted dark chocolate (for drawing ghost mouths; a small tube or a few ounces is plenty)
- Optional: Sprinkles, colored gels, or edible markers (for custom ghost faces and extra fun)
Ingredient tips: The strawberries need to be completely dry before dipping—any moisture will make the chocolate seize or slide off. For the white chocolate, I’ve found chips work fine, but melting wafers give a glossier finish and are less prone to clumping. If you want a dairy-free version, go for vegan white chocolate chips (like Enjoy Life), and swap coconut oil for a neutral-tasting vegan shortening.
If you’re out of coconut oil, you can skip it, but adding a little makes the chocolate smoother and easier to work with. For the eyes, mini chips are just the right size, but you can use black sesame seeds or tiny dots of dark chocolate if you prefer. The decorating gel is easiest for mouth details, but melted chocolate in a piping bag (or a zip-top bag with a tiny corner snipped) works too.
Have fun with the faces! I like to make half my ghosts look “scared” and the other half “silly.” If you’re making these for a party, set up a decorating station with sprinkles and colored gels so everyone can personalize their own ghost. That’s half the fun—and honestly, the more unique the faces, the cuter the platter looks.
Equipment Needed
- Microwave-safe bowl (for melting white chocolate; a glass bowl works best for even heating)
- Small spoon or spatula (for stirring melted chocolate)
- Baking sheet or tray (lined with parchment paper or wax paper for setting dipped strawberries)
- Toothpicks or skewers (optional, for dipping strawberries and adding face details)
- Piping bag or zip-top bag (for decorating ghost mouths; you can snip a tiny corner for precision)
- Paper towels (for drying strawberries—very important!)
If you don’t have a microwave-safe bowl, you can melt the chocolate using a double boiler on the stovetop. I’ve used both methods, but the microwave is fastest for small batches. Parchment paper makes cleanup a breeze and keeps the ghosts from sticking. If you don’t have piping bags, a zip-top bag works just fine for decorating—just don’t squeeze too hard, or you’ll get a chocolate explosion (been there, done that!).
For budget-friendly options, Dollar Store baking sheets and simple wax paper do the trick. Toothpicks are handy for fixing details or moving mini chips into place. After Halloween, I always make sure to clean my piping bags thoroughly so they’re ready for holiday cookie decorating next month.
Preparation Method
Ready to make your own batch of white chocolate strawberry ghosts? Follow these 5 simple steps for spooky-sweet perfection:
-
Prep Your Strawberries:
Wash 1 pound (450g) of strawberries gently and pat them completely dry with paper towels. Any moisture will keep the chocolate from sticking, so dry each berry carefully. Leave the green stems on—they make perfect ghost “tails.” Set aside on a clean towel. -
Melt the White Chocolate:
Place 12 ounces (340g) of white chocolate chips or melting wafers in a microwave-safe bowl. Add 1-2 teaspoons coconut oil if desired. Microwave in 20-second bursts, stirring after each, until smooth and silky (about 1-2 minutes total). If using a double boiler, melt gently over simmering water, stirring often.
Troubleshooting tip: If the chocolate seizes or turns grainy, add a tiny bit more coconut oil and stir vigorously. Don’t overheat—white chocolate burns fast! -
Dip the Strawberries:
Hold each strawberry by the stem and dip into the melted white chocolate, swirling to coat. Let excess drip off, then place gently onto a parchment-lined baking sheet. If the chocolate is too thick, microwave for another 10 seconds or add a dash of coconut oil.
Personal tip: If you’re making lots, dip half the batch, decorate, then dip the rest so the chocolate doesn’t set before you finish. -
Create Ghost Faces:
While the chocolate is still soft (but not runny), gently press two mini chocolate chips onto each strawberry for eyes. Let the chocolate set for 10-15 minutes (room temp works, or pop the tray in the fridge to speed things up). Once set, use a piping bag, zip-top bag, or decorating gel to draw ghostly mouths—scared, silly, or mischievous! Add sprinkles if you like.
Warning: Don’t rush the chilling step—if the chocolate isn’t firm, the faces will smear. -
Set and Serve:
Let your finished ghosts sit until the chocolate is fully hardened (about 30 minutes in the fridge). Arrange on a fun Halloween platter and serve chilled or at room temperature.
Efficiency tip: If you’re prepping in advance, store the finished ghosts in a single layer so they don’t stick together.
These steps are super beginner-friendly, and honestly, the biggest challenge is not sneaking bites before the ghosts are done! I love making a double batch and letting the kids “help”—it gets messy, but the memories are worth it. If you notice the chocolate setting too fast, work in batches and reheat as needed. And don’t worry if some ghosts look a little wonky—imperfect faces are part of the charm!
Cooking Tips & Techniques
The secret to flawless white chocolate strawberry ghosts is all in the prep and timing. Over the years, I’ve learned a few tricks that make the process smoother and the results more consistent.
- Use Room Temperature Strawberries: Cold berries can cause the chocolate to seize up or crack. Take them out 30 minutes before dipping.
- Dry Thoroughly: Even a tiny bit of moisture will ruin the chocolate coating. I’ve made the mistake of rushing this step—never again!
- Thin Your Chocolate: If the melted chocolate is too thick, add more coconut oil in small increments. This makes for a glossy, even shell.
- Decorate Quickly: The chocolate sets fast, especially in a cool kitchen. Get your decorations ready before dipping so you can work efficiently.
- Don’t Overheat White Chocolate: It can turn grainy if hot for too long. Short bursts in the microwave and lots of stirring are key.
One of my biggest “oops” moments was using super ripe strawberries—delicious, but they leaked juice and made the ghosts slide all over the tray. Medium-firm berries hold up best. Also, try to avoid overcrowding the tray; the ghosts need space to set up without bumping into each other.
If you’re multitasking, melt the chocolate while drying the strawberries, and prep your faces while the first batch sets. Keep extra mini chips or gels on hand for touch-ups. And remember—it’s Halloween! A few messy ghosts just add to the fun.
Variations & Adaptations
Whether you want to switch things up for dietary reasons or just add your own creative twist, there are plenty of ways to make these white chocolate strawberry ghosts unique:
- Dairy-Free/Vegan: Use vegan white chocolate chips and coconut oil. Melt as usual, and decorate with allergy-friendly toppings.
- Dark Chocolate Ghosts: Swap white chocolate for dark or semi-sweet chocolate. The faces pop against a deep, spooky background!
- Berry Variations: Try raspberries or blackberries for mini ghosts, or dip banana slices for “ghost faces” on a stick.
- Nut-Free: Skip coconut oil and use a nut-free shortening if needed. Check decorating gels for allergens.
- Custom Faces: Use edible markers, colored gels, or sprinkles for silly, scary, or even pumpkin-themed ghosts.
I once made a batch with freeze-dried strawberry powder sprinkled over the white chocolate—gave the ghosts a rosy blush and extra flavor! You can also dip only half the strawberry for a “fading ghost” effect, or use colored chocolate melts for rainbow ghosts (the kids love those). If you want to make these gluten-free, just check all labels—most chocolates and gels are naturally gluten-free, but some brands sneak in wheat.
Get creative and let your guests decorate their own ghosts at a party. I always put out extra toppings and let everyone go wild—no two ghosts ever look the same, and that’s the best part!
Serving & Storage Suggestions
White chocolate strawberry ghosts are best served chilled, straight from the fridge. Arrange them on a festive Halloween platter, scatter a few fun sprinkles around, and watch them disappear in seconds. They pair perfectly with hot chocolate, spiced cider, or a mug of coffee for grown-ups.
If you’re serving at a party, keep the ghosts in a cool spot—warm rooms can make the chocolate shell soften. For storing, layer the ghosts in a single layer in an airtight container with parchment between each layer. Refrigerate for up to 2 days; after that, the strawberries start to soften and the chocolate can get sticky.
To freeze, place ghosts on a baking sheet in the freezer until firm, then transfer to a zip-top bag. Thaw in the fridge before serving. Reheating isn’t recommended—these are best cold or room temp. The flavor actually gets better after a few hours, as the chocolate sets and the berry flavors mingle. If you have leftovers (rare, but it happens!), they make a sweet snack or lunchbox surprise the next day.
Nutritional Information & Benefits
Each white chocolate strawberry ghost has approximately:
- Calories: 70-90 per ghost (varies by size)
- Fat: 4-6g
- Sugar: 8-10g
- Vitamin C: 15% daily value (from strawberries)
Health perks: Strawberries are packed with antioxidants, vitamin C, and fiber. Using real fruit makes this treat lighter than most Halloween desserts. If you go dairy-free, vegan chocolate chips contain less saturated fat. These ghosts are naturally gluten-free and nut-free (if you skip coconut oil), so they’re friendly for most allergies. Just watch out for dairy in the chocolate and check labels if you’re avoiding soy.
Personally, I love making these as a “better-for-you” Halloween treat—they satisfy my sweet tooth without the sugar overload. Even my nutrition-conscious friends reach for seconds!
Conclusion
White chocolate strawberry ghosts are the ultimate easy Halloween treat—festive, fun, and so delicious. Whether you’re hosting a party, baking with kids, or just want a sweet snack that feels special, these ghosts check every box. You get the perfect combo of juicy fruit and creamy chocolate, plus playful faces everyone loves.
Don’t be afraid to mix things up with your favorite toppings and creative faces. That’s half the fun! I’ve made these every October for years, and they never get old. There’s something magical about watching a tray of plain strawberries turn into a spooky-cute army of ghosts. If you try them, let me know how yours turned out—drop a comment, share your photos, or tag me on Pinterest!
So go ahead—gather your ingredients, grab a friend (or a few little helpers), and make some ghostly memories. Happy Halloween and happy snacking!
Frequently Asked Questions
How far in advance can I make white chocolate strawberry ghosts?
You can make them up to 2 days ahead. Store in the fridge in a single layer for best freshness.
Can I use frozen strawberries for this recipe?
Fresh strawberries work best—frozen ones are too wet and can make the chocolate coating slide off.
What if my chocolate coating turns grainy?
Try adding a teaspoon of coconut oil and stirring gently. Make sure not to overheat the chocolate.
Can I make these ghosts dairy-free?
Yes! Use vegan white chocolate chips and coconut oil for a dairy-free version. Check all labels for allergens.
How do I transport these treats to a party?
Arrange ghosts in a single layer in an airtight container, separated by parchment paper. Keep chilled until serving.
Pin This Recipe!
White Chocolate Strawberry Ghosts – Easy 5-Step Halloween Treat
- Total Time: 40 minutes
- Yield: 20 ghosts 1x
Description
Spooky, sweet, and almost too adorable to eat, these white chocolate strawberry ghosts are a festive, kid-friendly Halloween treat. Juicy strawberries are dipped in creamy white chocolate and decorated with playful ghost faces for a lighter, fun alternative to traditional candy.
Ingredients
- 1 pound fresh strawberries (about 20 medium to large berries), washed and thoroughly dried, stems left on
- 12 ounces white chocolate chips or melting wafers
- 1–2 teaspoons coconut oil (optional, for thinning chocolate)
- 40 mini chocolate chips (for ghost eyes)
- Black decorating gel or melted dark chocolate (for ghost mouths)
- Optional: Sprinkles, colored gels, or edible markers for custom faces
Instructions
- Wash strawberries gently and pat them completely dry with paper towels. Leave stems on.
- Place white chocolate chips or melting wafers in a microwave-safe bowl. Add coconut oil if desired. Microwave in 20-second bursts, stirring after each, until smooth (about 1-2 minutes). Alternatively, melt using a double boiler.
- Hold each strawberry by the stem and dip into melted white chocolate, swirling to coat. Let excess drip off, then place on a parchment-lined baking sheet.
- While chocolate is still soft, gently press two mini chocolate chips onto each strawberry for eyes. Let chocolate set for 10-15 minutes (room temp or fridge). Once set, use decorating gel or melted dark chocolate to draw ghost mouths. Add sprinkles or colored gels if desired.
- Let ghosts sit until chocolate is fully hardened (about 30 minutes in the fridge). Arrange on a platter and serve chilled or at room temperature.
Notes
Use room temperature strawberries for best results. Dry berries thoroughly before dipping to prevent chocolate from seizing. Add coconut oil to thin chocolate if needed. Decorate quickly before chocolate sets. Store ghosts in a single layer in the fridge for up to 2 days. For dairy-free, use vegan white chocolate chips and coconut oil. Most ingredients are naturally gluten-free; check labels for allergens.
- Prep Time: 15 minutes
- Cook Time: 10 minutes
- Category: Dessert
- Cuisine: American
Nutrition
- Serving Size: 1 ghost
- Calories: 80
- Sugar: 9
- Sodium: 15
- Fat: 5
- Saturated Fat: 3
- Carbohydrates: 10
- Fiber: 1
- Protein: 1
Keywords: Halloween, strawberry ghosts, white chocolate, kid-friendly, party treat, easy dessert, spooky snacks, no bake, gluten-free, dairy-free option