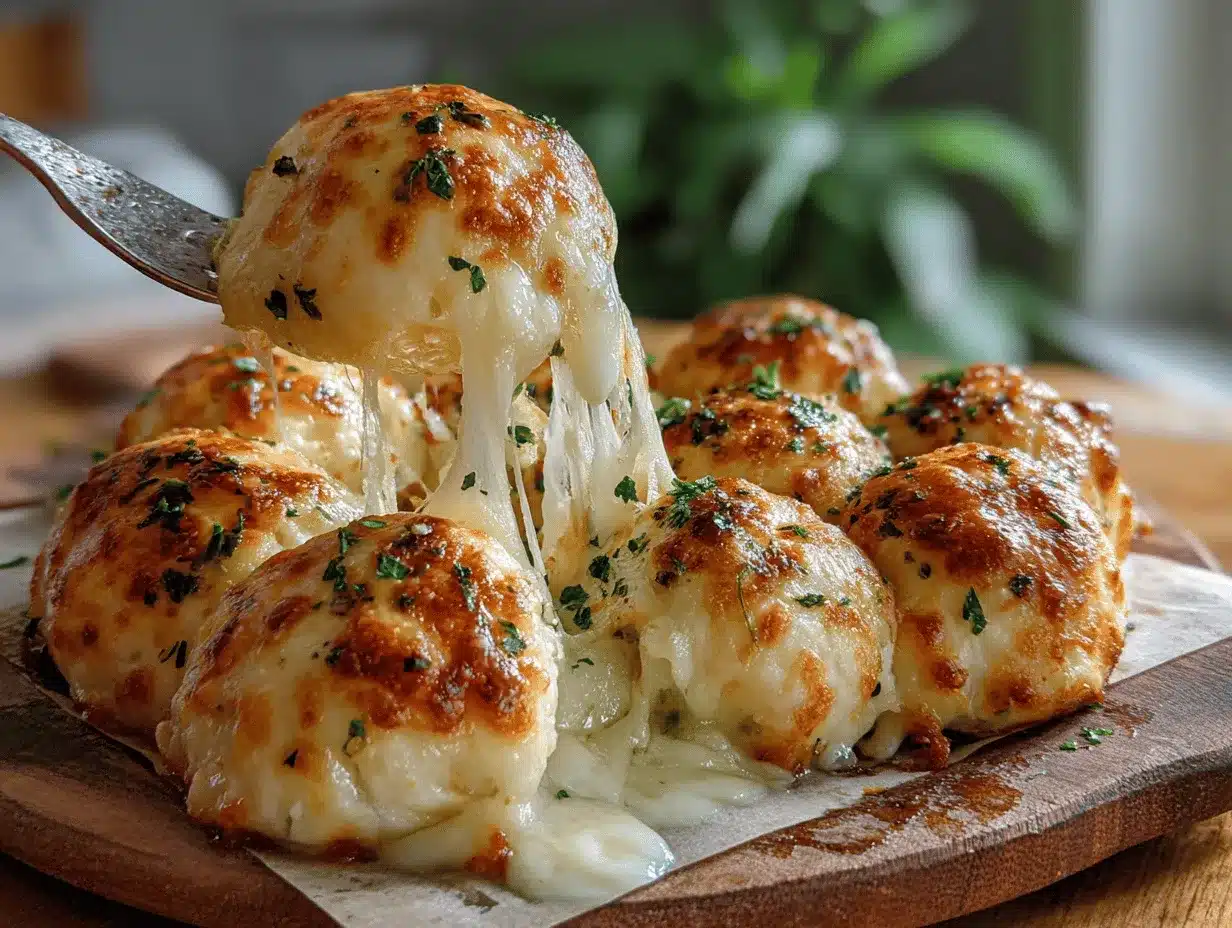
Steam rising off golden pizza bombs, a gooey cheese pull stretching between your fingers—yeah, that’s the kind of kitchen magic that gets everyone excited. The first time I made these cheesy pizza bombs, my little brother ate five before halftime, and honestly, I almost joined him. There’s just something about bite-sized, cheesy, saucy dough balls that screams “Let’s party!” and “Let’s eat!” all at once.
This cheesy pizza bombs recipe started out as a fun experiment: I wanted a finger food that packed all the flavor of a classic pepperoni pizza but was easy to eat (and way less messy). These little snack bites are perfect for game day, movie nights, or even just a regular Tuesday when you need a cheesy pick-me-up. They hit the spot every single time.
I’ve baked these cheesy pizza bombs for birthday parties, family gatherings, and even school events—kids and adults both grab seconds. They’re simple, but the payoff is huge. You get a soft dough, molten cheese, savory pepperoni, and a pop of pizza sauce in every bite. If you love pizza (and let’s face it, who doesn’t?), these bombs will quickly become your new favorite snack. And, if you’re into homemade recipes that don’t require hours in the kitchen, you’ll appreciate how quick and fuss-free this one is.
Whether you’re a seasoned home cook, a busy parent, or a self-declared pizza fanatic, these cheesy pizza bombs are about to become your go-to for every occasion. Trust me, I’ve tested (and taste-tested) this recipe so many times, I could probably make it in my sleep. Let’s get rolling!
Why You’ll Love This Cheesy Pizza Bombs Recipe
I’ve made these cheesy pizza bombs at least a dozen times, and every batch gets rave reviews. Here’s why I swear by this recipe (and, honestly, why you’ll keep coming back for more):
- Quick & Easy: Ready in about 35 minutes from start to finish—perfect for last-minute parties or unexpected cravings.
- Simple Ingredients: You probably have everything you need at home: basic dough, cheese, pizza sauce, and toppings.
- Perfect for Any Occasion: These snack bites are ideal for game days, potlucks, movie marathons, or even a fun family dinner.
- Crowd-Pleaser: Kids love them, adults fight over the last one—seriously, I’ve seen it happen.
- Unbelievably Delicious: The combo of melty cheese, crispy edges, and zesty pizza sauce is pure comfort food heaven.
What sets these cheesy pizza bombs apart from other pizza-inspired snacks? I use a simple hack: mixing mozzarella and cheddar for the cheese filling, which gives you that perfect stretch and flavor. Also, I brush the dough with garlic butter before baking—it adds depth and a little extra wow factor. If you want to impress your friends without breaking a sweat, this recipe is your secret weapon.
Honestly, there’s nothing quite like the feeling of biting into a warm, cheese-stuffed dough ball and getting a burst of savory pizza flavor. It’s like all the best parts of pizza, minus the greasy mess. When you want something comforting, crave-able, and just plain fun, cheesy pizza bombs are the answer. Whether you’ve got picky eaters or hungry sports fans, these will win them all over.
Ingredients Needed for Cheesy Pizza Bombs
This recipe uses straightforward, easy-to-find ingredients—no weird stuff, just classic pizza goodness in bite-sized form. Here’s what you’ll need:
- For the dough:
- 1 can refrigerated pizza dough (or homemade, 13.8 oz / 390g)
- For the filling:
- 1 cup shredded mozzarella cheese (110g) (for that classic stretch)
- 1/2 cup shredded cheddar cheese (56g) (adds extra flavor)
- 1/2 cup pizza sauce (120ml) (use your favorite brand or homemade)
- 1/2 cup mini pepperoni slices (50g) (swap with turkey or veggie if needed)
- 1/4 cup grated parmesan cheese (20g) (optional, for a nutty kick)
- 1/4 teaspoon Italian seasoning (adds herby goodness)
- For the garlic butter topping:
- 3 tablespoons unsalted butter (42g), melted
- 1 clove garlic, minced (or 1/2 teaspoon garlic powder)
- 1 tablespoon chopped fresh parsley (optional)
- Optional ingredients & swaps:
- Swap in dairy-free cheese for allergy-friendly bombs
- Use pizza dough or biscuit dough—both work!
- Add cooked mushrooms, olives, or bell peppers for veggie lovers
- Try turkey pepperoni for a lighter option
If you want to go gluten-free, just swap in your favorite GF pizza dough. For more heat, toss a little red pepper flake into the filling. I’ve tried all sorts of brands, but Pillsbury and Trader Joe’s pizza doughs work great. Grab what’s on sale—these bombs are forgiving!
Equipment Needed
You don’t need a fancy kitchen to whip up these cheesy pizza bombs. Here’s the basic gear:
- Baking sheet (preferably nonstick or lined with parchment paper; easy cleanup!)
- Small mixing bowls (for cheese, sauce, and garlic butter)
- Pastry brush (for that glorious garlic butter finish; a spoon works, too)
- Sharp knife or kitchen scissors (to cut the dough)
- Measuring cups and spoons (accuracy matters for gooey cheese ratios!)
- Parchment paper (optional, but helps avoid sticking and makes cleanup a breeze)
If you don’t have a pastry brush, I’ve used the back of a spoon, and it works fine. For the baking sheet, if yours is older and tends to stick, just grease it or use parchment paper—it’s a lifesaver. Budget tip: Dollar store mixing bowls get the job done (no need for anything fancy). Keep your equipment clean between batches; sticky cheese can be tough to scrub off if left too long.
Preparation Method: Step-by-Step Cheesy Pizza Bombs
- Preheat your oven: Set to 400°F (200°C). Let it heat while you prep—nothing worse than cold pizza bombs!
- Prepare your baking sheet: Line with parchment paper or lightly grease for easy removal. Trust me, you’ll thank yourself later.
- Cut the dough: Unroll the pizza dough and cut into 16 even squares. If using homemade dough, roll into a rectangle (about 10×14 inches / 25x35cm), then slice.
- Stuff the bombs: Place a teaspoon of pizza sauce, a sprinkle of mozzarella and cheddar, a few mini pepperonis, a pinch of parmesan, and a dash of Italian seasoning in the center of each square. Don’t overfill—otherwise, they’ll burst in the oven. (Been there, cleaned that mess.)
- Seal the bombs: Pull up the corners and pinch tightly to seal. Roll into a ball shape. If the dough sticks, dust with a little flour.
- Arrange on baking sheet: Place seam-side down, about 1 inch (2.5cm) apart. They’ll puff up, so give them a little space.
- Make the garlic butter: Melt butter in a microwave-safe bowl (about 30 seconds). Stir in minced garlic and parsley.
- Brush and bake: Brush each bomb generously with garlic butter. Bake for 15-18 minutes, until golden brown and bubbly. The smell will drive you wild!
- Cool slightly: Let cool on the sheet for 5 minutes. Cheese is molten right out of the oven, so don’t burn your tongue (I speak from painful experience).
- Serve: For extra flavor, brush with more garlic butter and sprinkle with a bit of parmesan. Serve with extra pizza sauce for dipping.
Prep tip: If your dough tears, patch with a scrap—imperfect bombs taste just as good. If you notice cheese leaking out during baking, don’t panic. It happens! Just scoop any spillage back onto the bombs before serving. For big batches, assemble the bombs ahead of time and refrigerate until ready to bake.
Cooking Tips & Techniques
I’ve had a few cheesy pizza bomb fails over the years, so here’s what I’ve learned (sometimes the hard way):
- Seal tightly! If the dough isn’t pinched well, the cheese will ooze out. Double pinch the seams, or use a fork to crimp if you’re worried.
- Don’t overstuff. More filling sounds better, but too much makes them explode. Stick to a teaspoon of sauce and cheese per bomb.
- Use cold dough. If your dough is too warm, it gets sticky and hard to work with. Chill it in the fridge for 10 minutes if needed.
- Bake until deep golden. Underbaking leads to doughy centers. Look for brown edges and bubbling cheese.
- Timing matters. Start prepping the filling while the oven preheats. This way, you’re not waiting around.
- Multitask: While bombs bake, mix up a dipping sauce or slice veggies for a quick side.
- Consistency: Use the same amount of filling in each bomb for even cooking. I use a small cookie scoop for speed and accuracy.
Honestly, I’ve burnt a batch or two by forgetting the timer. Set it loud! For crispy bottoms, bake on the lower rack. If you want extra crunch, spray the tops with a little oil before baking. Pizza bombs are forgiving, so don’t stress if the first batch isn’t perfect—practice makes delicious.
Variations & Adaptations for Cheesy Pizza Bombs
The best thing about cheesy pizza bombs is how easy they are to tweak. Here are some fun ways to switch things up:
- Dietary swaps: Use gluten-free pizza dough (like Bob’s Red Mill) for a GF batch. Dairy-free cheese works great for vegan bombs, and turkey pepperoni is a nice lower-fat alternative.
- Seasonal flavors: In summer, add chopped fresh basil and cherry tomatoes for a Margherita twist. For fall, try a little cooked sausage and roasted peppers.
- Flavor boosts: Stir pesto into the cheese filling, or add a sprinkle of chili flakes for heat. Try BBQ sauce instead of pizza sauce for a smoky vibe.
- Cooking method: Air fryer fans—these pizza bombs crisp up beautifully at 375°F (190°C) for 8-10 minutes. Great for small batches and less oil.
- Allergen substitutions: Use soy-based cheese for nut allergies, and skip pepperoni for vegetarians. Stuff with mushrooms, spinach, or olives for extra veggie power.
My personal favorite? Hawaiian pizza bombs stuffed with ham, pineapple, and mozzarella. It’s an unexpected combo, but always gets a surprised smile from guests. Don’t be afraid to get creative—these bombs are fun to customize!
Serving & Storage Suggestions
Serve cheesy pizza bombs warm, right out of the oven. The cheese pull is best when they’re fresh, but they’re tasty at room temp, too. For a party platter, pile them high in a bowl lined with a checkered napkin—super cute for Pinterest photos!
Offer a bowl of pizza sauce or ranch for dipping. These bombs pair well with crisp salads, veggie sticks, or cold sodas. They make a great side for soups, too (tomato soup is a winner). For game day, set them out with wings and chips for a snack feast.
Storage: Cool leftovers completely, then store in an airtight container in the fridge for up to 3 days. To freeze, wrap individually in foil, then place in a zip-top bag; they’ll keep for 2 months. Reheat in a 350°F (175°C) oven for 5-8 minutes, or zap in the microwave for 30 seconds (though the oven keeps them crispy).
Flavor tip: The garlic butter seeps in overnight, so leftovers taste even richer the next day. If you’re prepping for a party, bake ahead and reheat just before serving.
Nutritional Information & Benefits
Each cheesy pizza bomb clocks in at about 110 calories, with 6g protein, 9g carbs, and 6g fat (per bomb, based on standard ingredients). Mozzarella and cheddar provide calcium and protein, making these snack bites more filling than typical party snacks.
You can make these bombs lower-carb by using almond flour dough and turkey pepperoni. If you have nut allergies, stick to classic dough and dairy cheese. They’re also an easy way to sneak in veggies if you chop them finely—kids won’t even notice!
As someone who appreciates balanced snacking, I love that these bombs hit the spot without being just empty carbs. They’re fun, satisfying, and easy to tailor for different dietary needs. Always check the ingredient labels if you have food allergies—some doughs may contain traces of nuts or soy.
Conclusion
Cheesy pizza bombs are the ultimate game day snack—easy, fun, and packed with pizza flavor. You get all the goodness of a classic slice, but in a bite-sized, shareable form. I love making these because they bring people together, spark smiles, and disappear fast!
Don’t be shy about switching up the fillings or dough. This recipe is super forgiving, and your personal twist might become the new family favorite. Whether you’re hosting a crowd or just craving something cheesy, these pizza bombs deliver every time.
Give this recipe a try, and let me know how you make it yours! Drop a comment below with your favorite variation, or share your cheesy pizza bombs on social media—I love seeing your delicious creations. Here’s to happy snacking and winning game days!
FAQs About Cheesy Pizza Bombs Recipe
Can I make cheesy pizza bombs ahead of time?
Absolutely! Assemble and refrigerate them up to 24 hours before baking. Bake fresh for best results, or reheat in the oven if needed.
What’s the best cheese for pizza bombs?
Mozzarella is classic for stretch, but mixing with cheddar or parmesan adds extra flavor. Feel free to use your favorites!
Can I freeze pizza bombs?
Yes! Cool completely, wrap in foil, then freeze for up to 2 months. Reheat straight from the freezer in a 350°F (175°C) oven for 10 minutes.
Are pizza bombs gluten-free?
If you use gluten-free pizza dough, they’re totally GF-friendly. Just check your other ingredient labels to be sure.
What dipping sauces go best with cheesy pizza bombs?
Classic pizza sauce is the go-to, but ranch, garlic butter, or even spicy marinara are crowd favorites. Try a few and find your favorite!
Pin This Recipe!


Cheesy Pizza Bombs
- Total Time: 33 minutes
- Yield: 16 pizza bombs 1x
Description
Cheesy Pizza Bombs are bite-sized, gooey, and savory snack bites packed with all the flavors of classic pepperoni pizza. Perfect for game day, parties, or a quick cheesy treat, these easy homemade bombs feature molten cheese, pizza sauce, and pepperoni wrapped in soft dough and brushed with garlic butter.
Ingredients
- 1 can refrigerated pizza dough (13.8 oz)
- 1 cup shredded mozzarella cheese
- 1/2 cup shredded cheddar cheese
- 1/2 cup pizza sauce
- 1/2 cup mini pepperoni slices
- 1/4 cup grated parmesan cheese (optional)
- 1/4 teaspoon Italian seasoning
- 3 tablespoons unsalted butter, melted
- 1 clove garlic, minced (or 1/2 teaspoon garlic powder)
- 1 tablespoon chopped fresh parsley (optional)
Instructions
- Preheat oven to 400°F (200°C).
- Line a baking sheet with parchment paper or lightly grease it.
- Unroll pizza dough and cut into 16 even squares. If using homemade dough, roll into a 10×14 inch rectangle and slice.
- Place a teaspoon of pizza sauce, a sprinkle of mozzarella and cheddar, a few mini pepperonis, a pinch of parmesan, and a dash of Italian seasoning in the center of each square.
- Pull up the corners and pinch tightly to seal each bomb. Roll into a ball shape.
- Arrange bombs seam-side down on the baking sheet, about 1 inch apart.
- Melt butter and stir in minced garlic and parsley.
- Brush each bomb generously with garlic butter.
- Bake for 15-18 minutes, until golden brown and bubbly.
- Let cool on the sheet for 5 minutes before serving.
- Optional: Brush with more garlic butter and sprinkle with parmesan. Serve with extra pizza sauce for dipping.
Notes
Seal the dough tightly to prevent cheese from leaking. Don’t overstuff the bombs. Use cold dough for easier handling. For extra crunch, bake on the lower rack or spray tops with a little oil. Pizza bombs can be customized with different fillings and are forgiving if the dough tears—just patch with a scrap. Assemble ahead and refrigerate for up to 24 hours before baking.
- Prep Time: 15 minutes
- Cook Time: 18 minutes
- Category: Appetizer
- Cuisine: American
Nutrition
- Serving Size: 1 pizza bomb
- Calories: 110
- Sugar: 1
- Sodium: 250
- Fat: 6
- Saturated Fat: 3
- Carbohydrates: 9
- Fiber: 1
- Protein: 6
Keywords: pizza bombs, cheesy snack, game day, appetizer, finger food, pepperoni, mozzarella, party food, easy recipe